

This post is sponsored by Legrand. All opinions about the products mentioned are my own.
Henry is a pretty techie guy and one thing I kept hearing as we were planning our new home was how he wanted to make sure and install smart lighting for the exterior lights. Of course, I went along with it and was happy to try it out.
All I have to say is that thanks to Henry, I am completely sold on smart lighting. It is so convenient! We love it so much we have already started adding in other smart switches as well.
We went with Legrand’s the Radiant collection for our smart lighting. It gives you all of the cool features in an elegant design, which is a big plus for us!
One of the places we decided to add another smart switch is in our kitchen. As we were talking about adding some more, we realized it was one of the most important areas. We head to the kitchen as soon as our feet hit the floor every morning. Coffee is always a must right after we wake up! Henry installed this one in the kitchen underneath our floating shelves. This is where we go to turn on our lights every morning.

He said it was so easy that I could do it. So I accepted the challenge and installed one in our daughter’s room. Here’s how I did it:
What is Smart Lighting?
If you’re not yet familiar with smart Lighting, it’s basically lighting that can be controlled with a smart device. You can cut your lights on and off from your phone, whether you’re at home or on vacation. You can also set lights to come on and go off at a certain time all through an app.

This means no more getting out of bed to turn off the light or wasting extra electricity because your child left the light on upstairs.
Legrand’s smart lighting can also be controlled with voice through Siri, Alexa, or Google Assistant. The convenience of smart lighting can save you money and also be so handy.
How to Install Smart Lighting
As I mentioned before, switching out to a smart switch is very simple and will only take 10-15 minutes. You will only need three supplies:
- Phillips screwdriver
- wire stripper (maybe)
- voltage tester

Make sure before you start to go to your breaker box and turn off the power to the switch you will be changing out. Then use a voltage checker to double-check that there is no juice going to the switch. Safety first!
Step 1: Remove Existing Switch
Now it’s time to remove the existing switch. Unscrew the screws to the existing switch plate. And unscrew the screws from the switch that secure it to the junction box.
Pull the switch from the junction box so you can access the wires.
Tip: Taking a picture of how the light switch was wired would be a definite plus. This will help you know which wires are which when installing the new switch.
Step 2: Install the Smart Switch
Once you have removed the existing switch, pull off the pre-stripped ends to the smart switch wiring.
Keep in mind, the colors within your existing box may be different. Follow the wiring instructions in the Legrand installation guide.
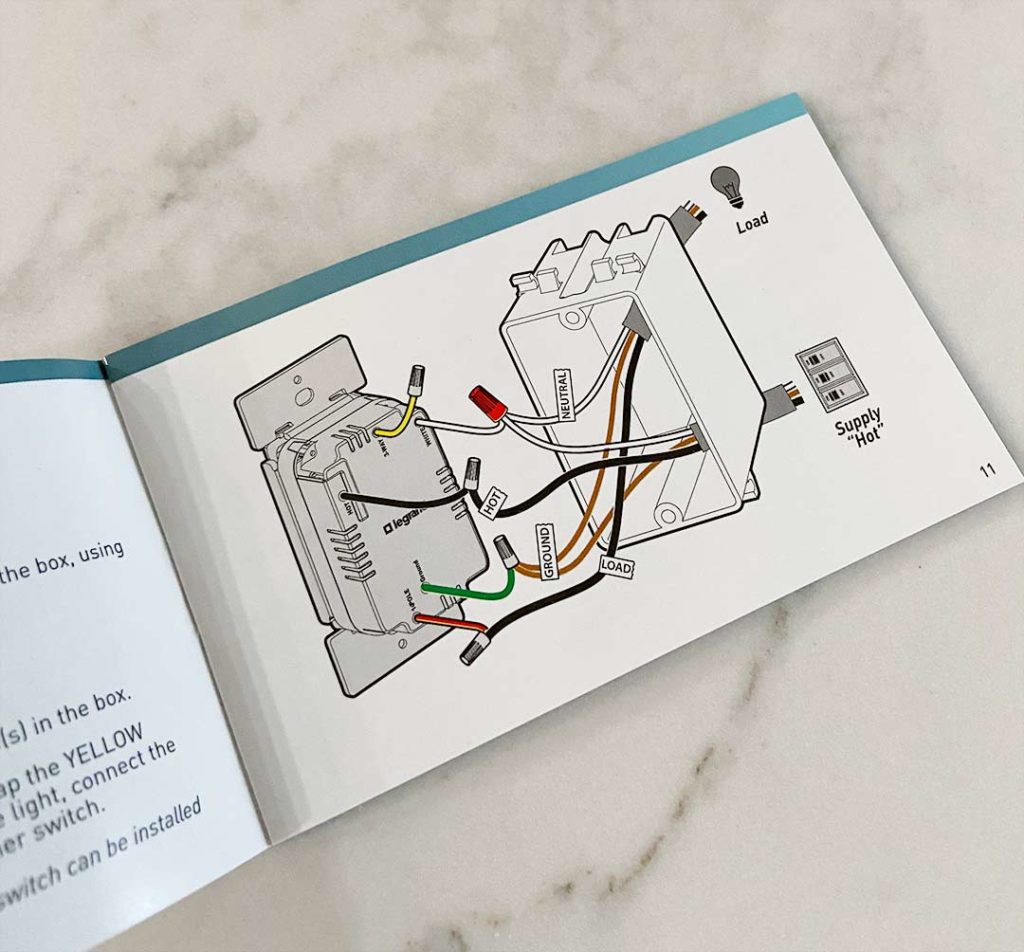
Using the supplied wire nuts, connect the neutral wires white to white, the hot wires black to black, and the red wire to the load wire. Then connect the green ground wire to the ground wire in the box.

Make sure all connections are good and tight with the wire nuts. Put all the wires back in the box and then screw on the Legrand smart switch.

Tip: If you use a power screwdriver, be careful not to overtighten.
Then snap the screwless cover plate on. I absolutely love the clean look of the screwless wall plate that comes with the Legrand Smart Lighting switches.

Now it’s safe to turn the power back on.
Step 3: Set Up the App
Now it’s time to add the switch to your Legrand app. If you don’t already have the app on your phone, you’ll need to download it.
The app is very intuitive and steps you through the process.
First, you scan the QR code and follow the prompts. Frist your phone will connect to the light switch. Then you will connect the light to your wi-fi network. This will only take a few minutes and you will be ready to control the switch from your phone!

You can choose an icon and give it a specific name. Creating groups is also possible. For example, we have all of our exterior lights in one group. This allows us to cut them all on and off with the click of one button.
As I mentioned before, you can also put your lights on a schedule. This is what we did in our kitchen. The light will come on at exactly the time I get up every morning. Now I won’t trip over the couch on my way to make my morning coffee.


4 Comments
Is there a additional cost to using smart lighting?
March 5, 2020 at 1:59 amHi Roxanne. Yes, there is additional cost upfront since smart switches do cost more than traditional switches.
March 5, 2020 at 2:06 amWhat switch did you purchase that controls all exterior lights? Did you purchase the 3 n1 or 4 way?
April 27, 2020 at 2:04 pmWhether you get the single pole switch or 3-way/4-way depends on how your lights are wired. If there is just one switch controlling the light, you need a single pole. If there is 2 switches controlling the same light, you need a 3-way. As for controlling all outside lights, that is done through the app. All outside lights will need to have a smart switch installed. Then you can group them in the app. Hope that helps.
April 27, 2020 at 2:17 pm