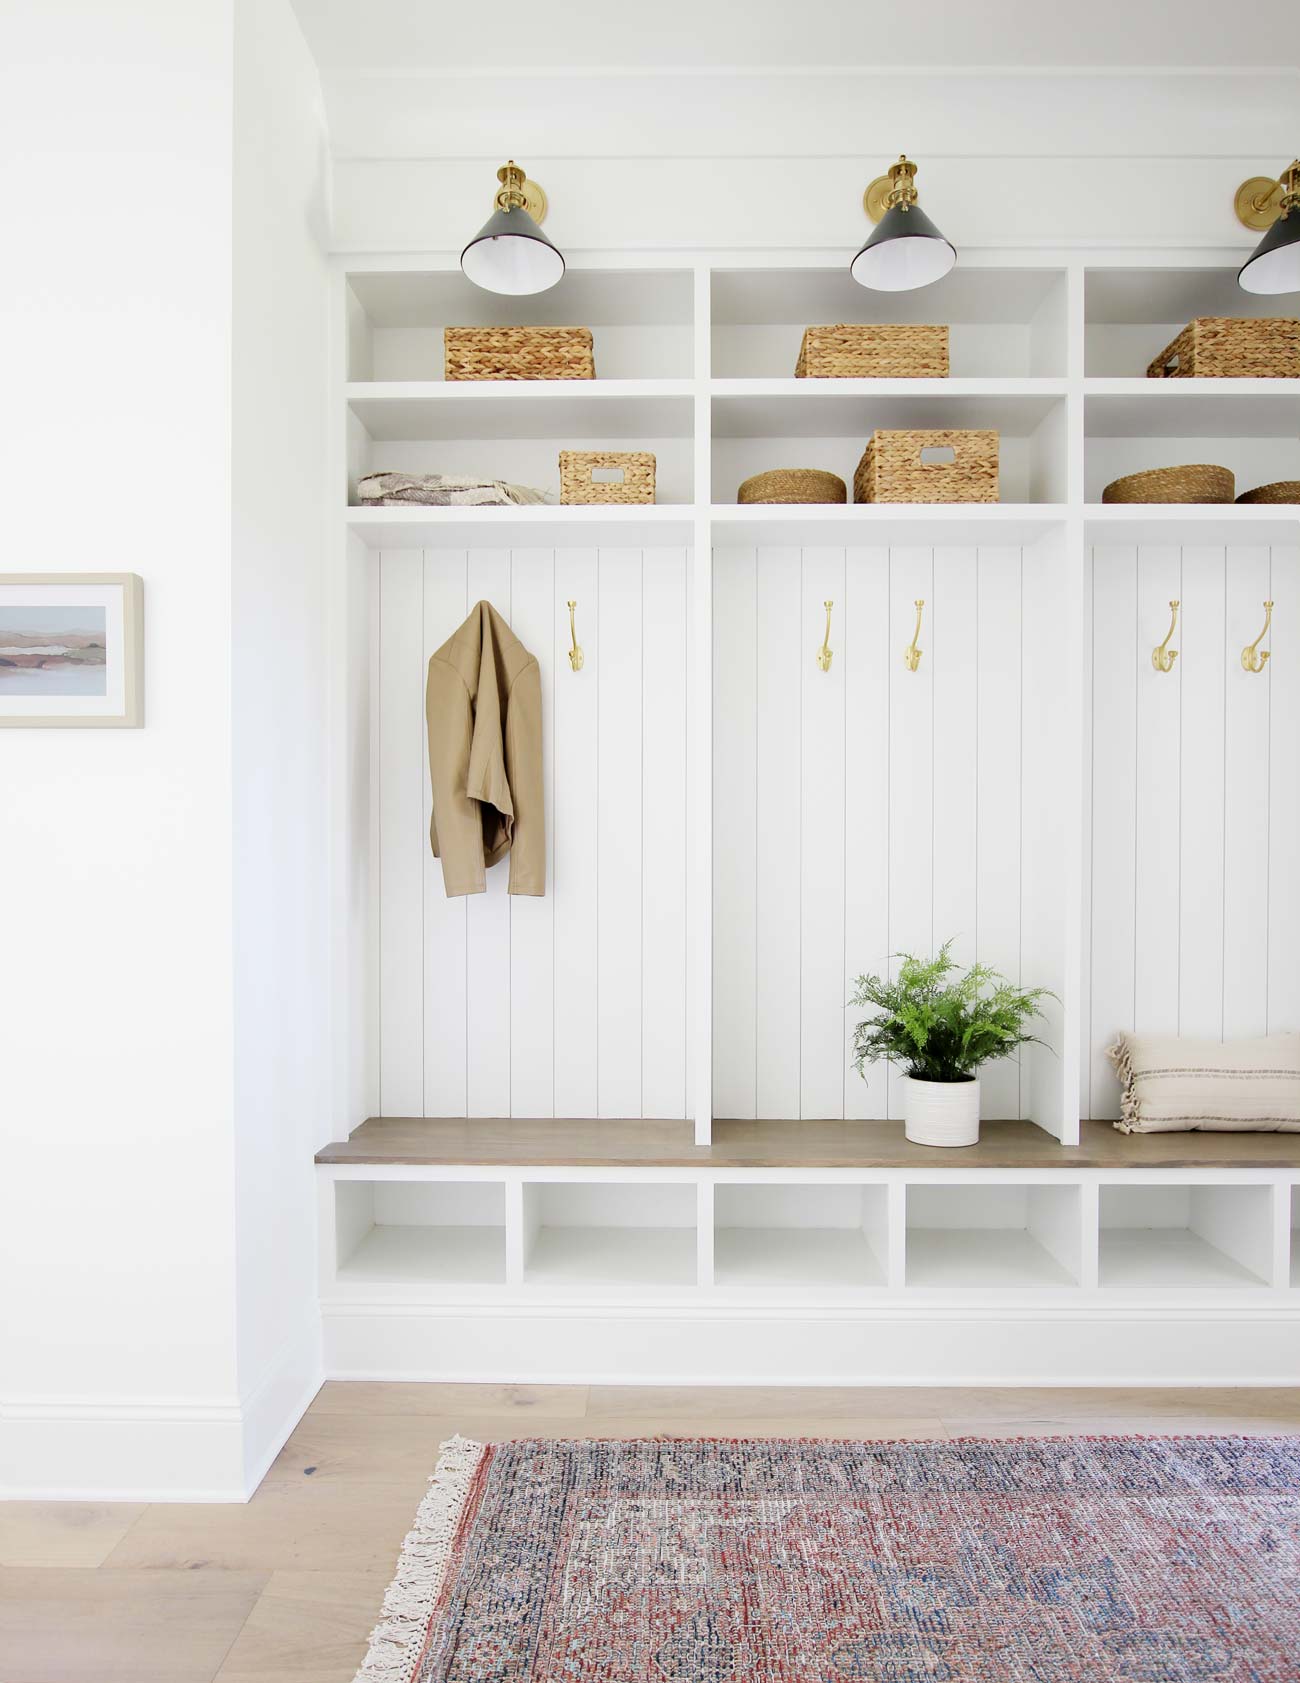
Room Sources: Wall Sconces | Hooks | Baskets | Plant
Our mudroom is one of the most utilized rooms in our house. We pass through it every time we come and go, and it’s the drop zone for shoes, backpacks, coats, and a lot of other everyday items. To get the most functionality out of this space, I designed and built custom mudroom lockers to make storing these items more convenient and organized.
Before deciding on a locker layout, it can be helpful to explore different styles and storage solutions. If you’re still planning your space, browse our favorite mudroom inspiration and ideas to see a variety of mudroom layouts, built-in storage options, and design styles that can help you determine what works best for your home.
Mudroom lockers are one of the most practical storage solutions you can add to a home. Whether you’re looking to organize backpacks, shoes, coats, sports equipment, or everyday essentials, built-in mudroom lockers can help create a more functional and clutter-free space. In this guide, I’ll show you exactly how I built our DIY mudroom lockers, along with standard mudroom locker dimensions, design ideas, and planning tips to help you create a solution that works for your home.
Keep in mind that the dimensions in this tutorial are specific to the space I had available. Every mudroom is different, so you’ll likely need to adjust the measurements to fit your layout and storage needs. The overall process, however, can be adapted to mudrooms of nearly any size.
What is a mudroom?
A mudroom is a small room or area near the backdoor or garage where people can take off their shoes and coats before entering the main living area. The idea is to help keep dirt out of the house, and it can also be a handy place to store outdoor gear like umbrellas and hats. Mudrooms are especially common in homes with kids or pets, but they can be useful for anyone who wants a drop zone for items. Mudrooms usually have hooks, a bench, or built-in lockers. And sometimes they might even include a sink.
Before you start building these lockers, I recommend that you grab our printable plans to make the build much easier. The plans include more detailed instructions and the SketchUp 3D model!
How Much Do Mudroom Lockers Cost?
| Type | Typical Cost |
|---|---|
| DIY Mudroom Lockers | $300–$1,500 |
| Semi-Custom | $1,500–$4,000 |
| Custom Built-In | $3,000–$10,000+ |

Our mudroom locker project cost approximately $800 to $1,000 in materials, including the sheet goods, trim, hardware, paint, and finishing supplies. By building the lockers ourselves, we were able to create a custom built-in look for a fraction of what professionally installed mudroom lockers typically cost. Depending on the materials you choose and the size of your project, your total cost may be higher or lower than ours.
Best Materials for Mudroom Lockers
| Material | Best For |
|---|---|
| MDF | Painted lockers |
| Plywood | DIY projects |
| Poplar | Painted trim |
| White Oak | Premium projects |
Material List
- Finish Nailer
- Tape Measurer
- Wood Glue
- Miter Saw
- Table Saw
- Clamps
- Sand Paper
- 1 1/4″ Finish Nails
- 2″ Finish Nails
Wood
Since room dimensions vary, I’m only providing the types of lumber and millwork needed.
- 1×12’s
- 1×2’s
- 1×6’s stain grade wood (seating)
Everywhere I put two pieces of wood together, you can assume that I nailed and glued it. I’m telling you this here, so I won’t bore you by repeating myself in every step.

Room Sources: Wall Sconces | Hooks | Baskets | Plant
Step1: Build the Base
Any time I build built-ins, I like for the baseboard in the room to continue around the bottom of what I’m building. I think it creates a more integrated look. Our baseboard is 7 1/2″, so that played a role in determining the locker base height.

For the front of the base, I used a 1×10″. I also used 1×10″ for the ends and support pieces and cut them to the dimensions shown in the diagram above. I used my finish nailer to fasten all of the pieces.


Then using a table saw, I cut a 1×6 down to 4 3/8″ wide. I used this along with a 1×12 to make the top of the base. I nailed these two boards to the ends and supports.
Step 2: Shoe Compartments
The next step was to build the shoe compartments. I started by cutting 7 pieces of 1×12 to 15 5/8″ long.

Then I nailed the two end pieces to studs in the wall.

I connected the two ends with a piece of 1×2. Then I added each show compartment divider. I applied wood glue to the bottom of each and nailed the top to the 1×2.

Then I nailed a piece of 1×2 to the front of each divider. Refer to the dimensions in the diagram above.
Step 3: Seat
Once I had the shoe compartment built, it was time to add the seat. This might have been the easiest part of the build.


I applied wood glue to the edges of the oak and pulled them together tightly as I nailed them in place.
Step 4: Locker Dividers
Next, I added the locker dividers. I used a piece of 1×12 for each divider.


Then I nailed the two ends in place first.

I nailed some scrap wood pieces to the wall that served three purposes. They helped hold the middle two dividers in place, gave me something to nail the shiplap to, and gave me something to mount the hooks on.

To secure the bottom of the two dividers to the seat, I added some wood glue on the bottom of each piece.

Then I nailed a 2×12 to the top of the dividers.
Step 5: Vertical Shiplap
Next, I filled in the back wall of each locker section with pieces of 4″ shiplap ran vertically.

I started in the center of each section and worked my way out nailing to the scrap boards I added earlier.
Step 6: Top Shelves
I constructed each of the top shelf sections before placing them on top of the lockers.


Once I had each of the two layers built, I lifted them up and nailed them into place.
Step 7: Trim and Finishing Touches
Next, I added pieces of 1×2 to the front of the lockers to give them some additional thickness.

Then to top everything off, I added a 1×12 board and a piece of 7″ crown molding to take it all the way to the ceiling.

After I finished all of the building, I filled all of the holes and gave the lockers a good sanding. This made sure that they were nice and smooth and ready to be painted.
Later the electricians cut holes in the 1×12 above each locker section and mounted the wall sconces.

Room Sources: Wall Sconces | Hooks | Baskets | Plant
I couldn’t be happier with the way these mudroom lockers turned out. Not only do they look great, but they’ve made one of the busiest areas of our home significantly more functional. Everybody now has a dedicated place to store shoes, hang coats, and keep backpacks organized, which helps reduce clutter throughout the house.
If you’re building a new home, I highly recommend planning for mudroom lockers from the beginning. Incorporating built-in storage into the design process can make a huge difference in the functionality of the space. Many of our house plans include dedicated mudrooms and drop zones that can easily accommodate lockers, benches, and other storage solutions designed to keep everyday essentials organized and within reach.
Are Mudroom Lockers Worth It?
If your family struggles with backpacks, shoes, coats, and everyday clutter piling up near the entryway, mudroom lockers can be one of the best investments you make. They create designated storage spaces for each family member, improve organization, and can make a home feel more functional and intentional. For many homeowners, mudroom lockers quickly become one of the most-used features in the house.
FAQs
How deep should mudroom lockers be?
Most mudroom lockers are between 15 and 24 inches deep. Shallower lockers work well for coats, backpacks, and everyday items, while deeper lockers provide additional storage for larger gear and hanging clothing. For most homes, a depth of 18 to 20 inches offers a good balance between storage capacity and floor space.
How wide should mudroom lockers be?
Mudroom lockers are typically between 18 and 30 inches wide per person. Smaller lockers can work well for children, while wider lockers provide additional room for coats, backpacks, sports equipment, and seasonal items. The ideal width depends on your family’s storage needs and the amount of available space.
What is the standard height of mudroom lockers?
Most mudroom lockers range from 72 to 96 inches tall. Floor-to-ceiling lockers maximize storage and create a custom built-in appearance, while shorter lockers can help a smaller mudroom feel more open. Bench seating is typically installed at a height of 18 to 20 inches.
Are mudroom lockers worth it?
For many homeowners, mudroom lockers are one of the most useful storage upgrades they can make. They provide designated spaces for shoes, coats, backpacks, and other everyday items, helping reduce clutter and keep the home organized. Families with children often find that mudroom lockers quickly become one of the most-used features in the house.
What is the best material for mudroom lockers?
The best material depends on your budget and desired finish. MDF is a popular choice for painted mudroom lockers because it provides a smooth surface and is cost-effective. Plywood offers excellent durability for DIY projects, while hardwoods such as white oak can create a more custom, furniture-quality appearance.
How much do custom mudroom lockers cost?
Custom mudroom lockers can range from approximately $3,000 to $10,000 or more depending on the size, materials, finishes, and level of customization. DIY mudroom lockers can often be built for significantly less, making them a popular option for homeowners looking to maximize value while achieving a built-in look.
Should mudroom lockers have doors?
Both open lockers and lockers with doors have their advantages. Open lockers provide easy access and work well for busy families, while lockers with doors can help conceal clutter and create a cleaner appearance. The best choice depends on your storage needs and the overall style of your home.
Can mudroom lockers be added to an existing home?
Yes, mudroom lockers can be added to both new and existing homes. Many homeowners install built-in lockers in mudrooms, laundry rooms, garages, entryways, or other transitional spaces. With proper planning, custom lockers can be designed to fit a wide range of room sizes and layouts.
*This page contains affiliate links. If you make a purchase through one of these links, we earn a small commission at no additional cost to you.


25 Comments
Looks great. What color stain did you use on the bench?
June 2, 2020 at 4:16 pmThanks! I used Driftwood Gray by Olympic.
June 22, 2020 at 2:16 pmI followed the plans exactly and got great results!!! The only thing I’d do differently is stain the bench before hand. The wood glue I used on the bottom of the locker dividers screwed up my stain. I’m a rookie so I didn’t know that would happen. Thanks for the plans, we LOVE it.
June 9, 2020 at 12:48 pmThat’s great! Yes, that is something to watch out for. When using glue on wood that is going to be stained, you have to be very careful. If you do get some on the wood, you’ll need to sand it off ofter it dries and before you apply any stain.
June 22, 2020 at 2:18 pmThank you for sharing your plans! One question I had was how exactly did you nail the top shelf on in step 6? Also, for painting did you spray or use a brush/roller? Thanks!
July 7, 2020 at 4:56 pmI had the exact same question. I am not an experienced carpenter, but your plans seem very simple to follow, and I would like to mimic, but I am a little perplexed as to how you secured the top shelves to the top of the locker in step 6.
January 28, 2021 at 8:14 pmThe lockers look fantastic! Which brand and color of white paint did you use?
July 22, 2020 at 7:13 pmHey there Klaudia! Thank you for the kinds words. We used Sherwin Williams Pure White.
July 22, 2020 at 8:40 pmLove this article! How complicated do you think it would have been to add doors?
July 30, 2020 at 6:11 pmThanks! Doors are pretty tricky to build. But you can also have a local wood worker build them for you. You’ll just need to provide them with the correct dimensions.
August 6, 2020 at 6:03 pmYour lockers turned out great! Thanks for sharing. Can you tell me what design program you used to build these? I have been looking for a software just like that to build other things in my home. Thanks!
August 6, 2020 at 4:41 pmThanks! I use SketchUp.
August 6, 2020 at 6:04 pmLove this and can’t wait to use this tutorial in our drop zone. How tall are your ceilings? Ours our 9ft so I’m trying to figure the dimensions to the top for that piece of crown. Thanks in advance 🙂
August 10, 2020 at 8:44 pmHi! this is amazing cant wait to try it! one thing, i couldnt quite understand how did you secure the 1×12 board in step 7 before the crown molding part?
August 17, 2020 at 11:00 pmGreat work! I am.planning to do the same but a bookshelf into wall. How do I make it look like the shelf is one piece? With plaster?
August 27, 2020 at 12:00 pmHi there! We are just about to build these. What sheen did you use for the paint? Also, did you use brushes or rollers for the paint? Thank you so much, they look great!
September 23, 2020 at 12:16 amNice work! Planning to do something very similar in our new house. Thanks for documenting your process. Looks like you used a mix of MDF. Poplar and Oak as you mentioned for staining?
September 25, 2020 at 3:30 amApproximately how much did you spend on the materials?
November 11, 2020 at 11:02 pmI would really love to know this as well 🙂 thanks!
January 6, 2021 at 5:31 pmI would like to know this as well! 🙂
March 15, 2021 at 9:26 pmAny chance you could share your sketchup design files? This is a fantastic looking project – well done!
November 16, 2020 at 8:00 amHello (I AM FRENCH AND MY ENGLISH A LITTLE RUST)
November 24, 2020 at 12:47 pmSo : Nice Job ! Very country chic.
what wood (plywood?) do you advise ? And how many time to create this ?
When you purchase the design plans, can you change the dimensions to your size area so the lengths are correct? I want to know before purchasing otherwise the plans will be too big for my room.
March 15, 2021 at 9:27 pmWhere is a good supplier to get material like this?
April 1, 2021 at 6:09 amwonderful put up, very informative. I’m wondering why the other specialists of this sector don’t understand this. You must continue your writing. I’m sure, you’ve a great readers’ base already!
February 24, 2022 at 11:19 pm