

Room Sources: Woven Rug
Box beams are a good alternative to solid wood beams. Box beams are made of three individual pieces of wood that are nailed together to form what looks like a solid beam. It’s a much more economical option and it is something you can do yourself.
In our current house, we built and installed box beams in our family room. In this article, I’m going to show you how we did it.
Here’s what you’ll need:
- brad nailer
- 1 1/2″ brad nails
- 1×6″ clear pine (3 boards per beam)
- 2×6″ lumber (1 for each beam)
- stud finder
- drill
- 2 1/2″ wood screws
- wood glue
- tape measure
- air compressor
Step 1: Determine the Number of Box Beams
The first thing I did was decide how many beams I wanted, and this was really determined by the length of the room. After I decided that it would look best if they were spaced 6 feet apart, I determined that I would need to make 6 beams to fill the area evenly.
The number of beams you build will more than likely be different. Again, it all depends on the length of your room and the look you are going for.
Step 2: Find the Ceiling Joists
Installing beams during the building process meant I could mark my ceiling joist locations on the walls before the ceiling sheetrock was installed. But if you’re adding beams to an existing ceiling, you’ll need to use a stud finder to find the joists. Once you find your first one, the others should be easy since their normally 16 or 24 inches apart.
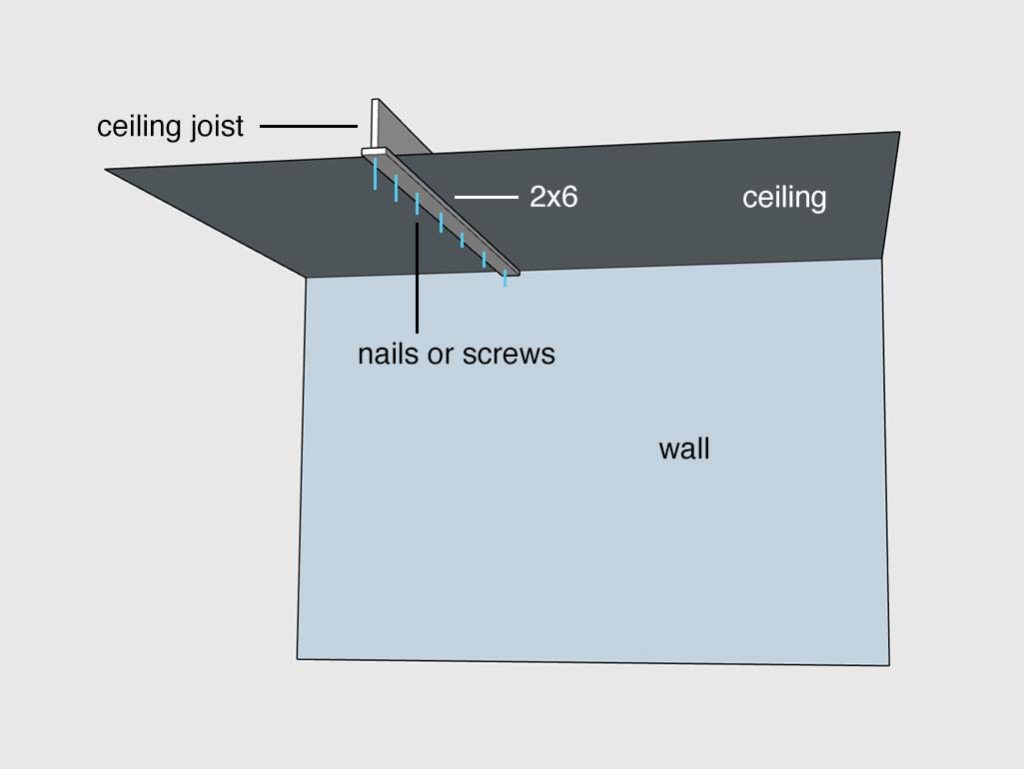
Step 3: Attach 2×6 Boards to the Ceiling
To determine how long the 2×6’s needed to be, I measured the width of the room, which was 15 feet.
Using a miter saw, I cut 6 2×6 boards to 15 feet. Then using a framing nailer, I attached each board to the marked ceiling joists. If you don’t have a framing nail gun, you can use a drill and wood screws.
Step 4: Build the Box Beams
To construct the box beams, the first thing I did was cut all of the pieces of 1×6″ pine boards to a length of 15 feet. This was the measurement of the width of the room from step 3.
I constructed each beam out of three pieces of pine. I set one piece up on its side. If you have someone to help you, they will need to hold this piece for you. If not, you will need something that is 5.5 inches tall to place the board on against and to help hold the next board in place. Chances are you don’t have something like that laying around, so you can use the scrap wood to build a couple of little boxes that are 5.5′ x 4.75″.
First, I squeezed a bead of wood glue down the edge of the first board. Then I placed the next board on top of that one to form an “L” shape and made sure the edges lined up.

Next, I started on one end of the boards and worked my way down to the other end nailing the two pieces together. Each time I made sure the edges were flush where I was nailing. I spread the nails apart about 12 inches.

Then I flipped over the two pieces that I just nailed together and repeated the gluing and nailing for the third piece.

I put the completed beam to the side and repeated the steps to make the rest of the beams.
Step 5: Stain the Beams
I stained my beams before I put them up. To match the other wood elements though out our main living area, I used a 1:1 mixture of Classic Gray and Red Oak.
You can use whatever color best compliments your room, but I would recommend experimenting with different colors on a scrap piece of wood before applying it to the beams.
Step 6: Install the Box Beams
Once all of the beams were stained and dry, it was time to install them. This part required two people and two ladders. We placed the ladders underneath the first 2×6 that we nailed up earlier.
Each of us holding one end of a beam climbed up the ladder and slid the beam onto the 2×6.
Then, using the brad nailer, I nailed the beam to the 2×6 on both sides as shown in the illustration. And I repeated this for the 5 remaining beams.

Something to Consider Before Installing Box Beams
One thing to consider before installing box beams in your house is your ceiling height. Beams can make a ceiling feel lower. I would not recommend installing beams on ceilings lower than 10ft. However, if you have a lower ceiling and you still want to put up beams, you could use a 1×4 instead of a 1×6 for the side pieces, giving you a shallower beam.


20 Comments
What color did you stain your beams? They are beautiful!!
March 25, 2019 at 12:45 amHi Brittany. Thanks! We used a 1:1 mixture of Classic Gray and Red Oak stain.
March 25, 2019 at 12:29 pmAfter you stained the beams, did you apply a poly or something else ?
July 27, 2019 at 4:07 pmHow tall are your ceilings? Love the look!
March 26, 2019 at 11:56 amThanks! Our ceilings are 10ft.
March 26, 2019 at 12:03 pmHow do you cover the seams? And the nails?
May 22, 2019 at 2:00 amWe didn’t worry about the seams. They are barely noticeable. However, you could do mitered corners, but you would need a table saw. As for the nail holes, we used wood filler.
November 11, 2019 at 5:28 pmThanks for giving such a great how-to guide!
November 11, 2019 at 1:48 pmWe currently have painted white box beams but I have always thought of giving them a new look by wrapping them with stained wood. I really connect style wise with this blog. Please keep up the good work!
Hello Nicole! Thanks so much for the kind words! This would be a great idea and you should go for it!
November 11, 2019 at 5:26 pmHenry,
March 19, 2020 at 2:54 pmAmazing ! I’m going to attempt this and use the 1×4’s as suggested because my ceilings are only 9ft. Thanks for thinking of everyone🥰 when approaching your projects. Feeling the love !
Thanks. It’s made by Franklin Corp.
July 7, 2020 at 2:42 pmHi there, any tips on how to find board the length you used? I need at least 13’ but am having a hard time finding any 1×6 boards longer than 12”.
June 11, 2020 at 12:37 amHenry,
Aside from the beautiful box beams and the well-laid-out instructions, I admire your sectional seating. Would you mind sharing where you got it? Thank you.
June 11, 2020 at 11:01 amAre all your wood pieces pine? Also all 1by 6 boards around the center?
July 4, 2020 at 11:39 amYes, they are all 1×6″ pine.
July 7, 2020 at 2:41 pmWe recently added beams and stained ourselves. Love them! Also curious about your sectional…would love to know where it is from.
March 30, 2021 at 12:22 amWhat stain brand and exact color did you use do you have a close up? My husband just used weathered oak minwax stain from Lowe’s and it’s not achieving the look I want for our basement ceiling beams. He has to stain them
June 18, 2021 at 9:12 pmTomorrow before putting them up I told him not to do anymore until I figure out how to achieve a different color.
Not sure I glossed over it, but typically a 2×6 and 1×6′ pine are both 5 1/2″ finished dimension so they should be square and work fine, but double check because if the 2×6 is undersized, then you’d need to rip your bottom piece to match. They look great.
September 18, 2021 at 7:24 pmHi Henry! Any tips for putting a bean on a vaulted/pitched ceiling?
March 15, 2022 at 2:34 pmHow do you find such long, straight boards?
March 16, 2022 at 1:04 pm