
Room Sources: Black Wall Sconce | Island Pendant Lights | Zline Range
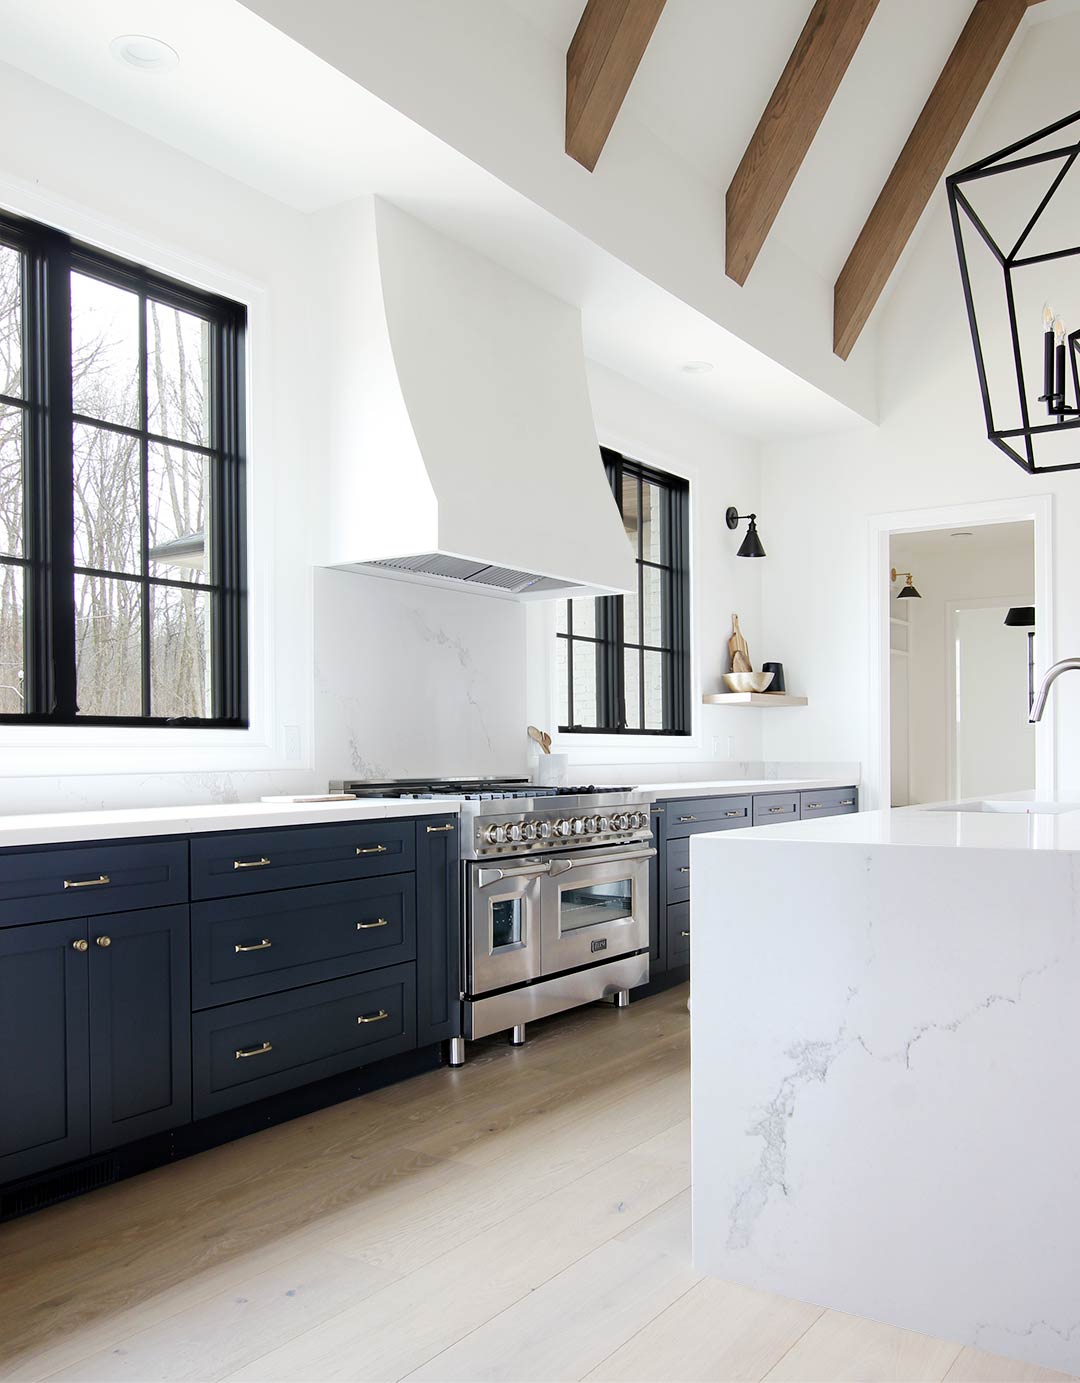
While designing the finishes of our new kitchen, we knew that we wanted to keep the overall look very clean and a mix of modern and traditional. We wanted the hood to have a seamless look, flowing from the wall and ceiling.
After some research, we decided that a plaster hood was the way to go. And after some more research, I learned that there was not a lot of info out there on how to go about building one.
At this point, I decided that this would be one of the projects I tackled in the new house. I documented the process so I could share it with you.
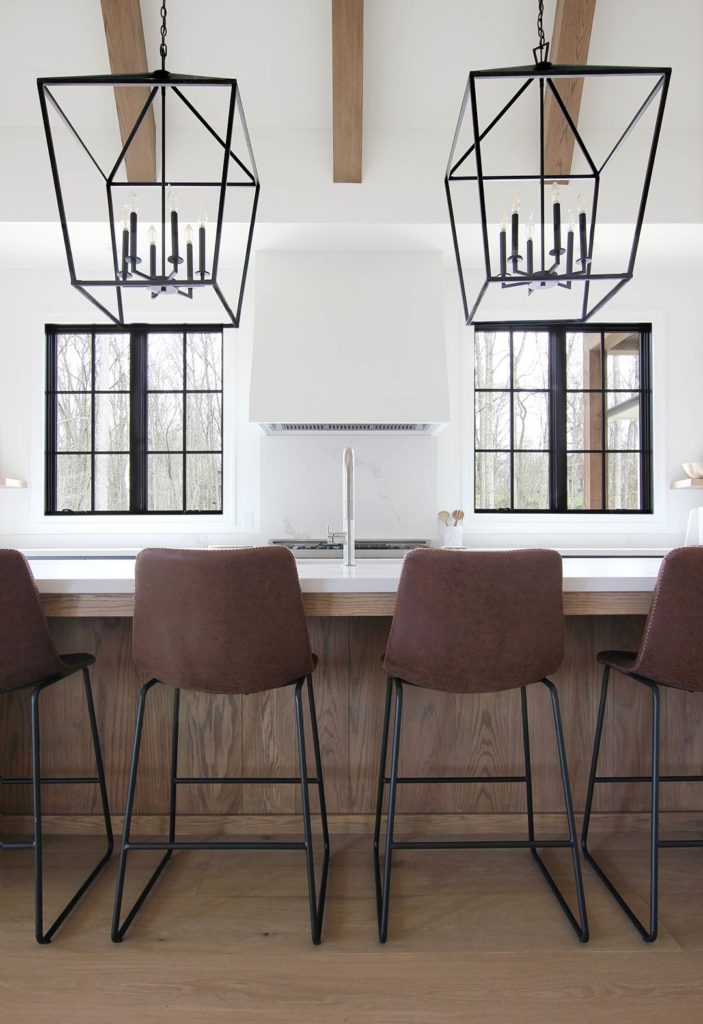
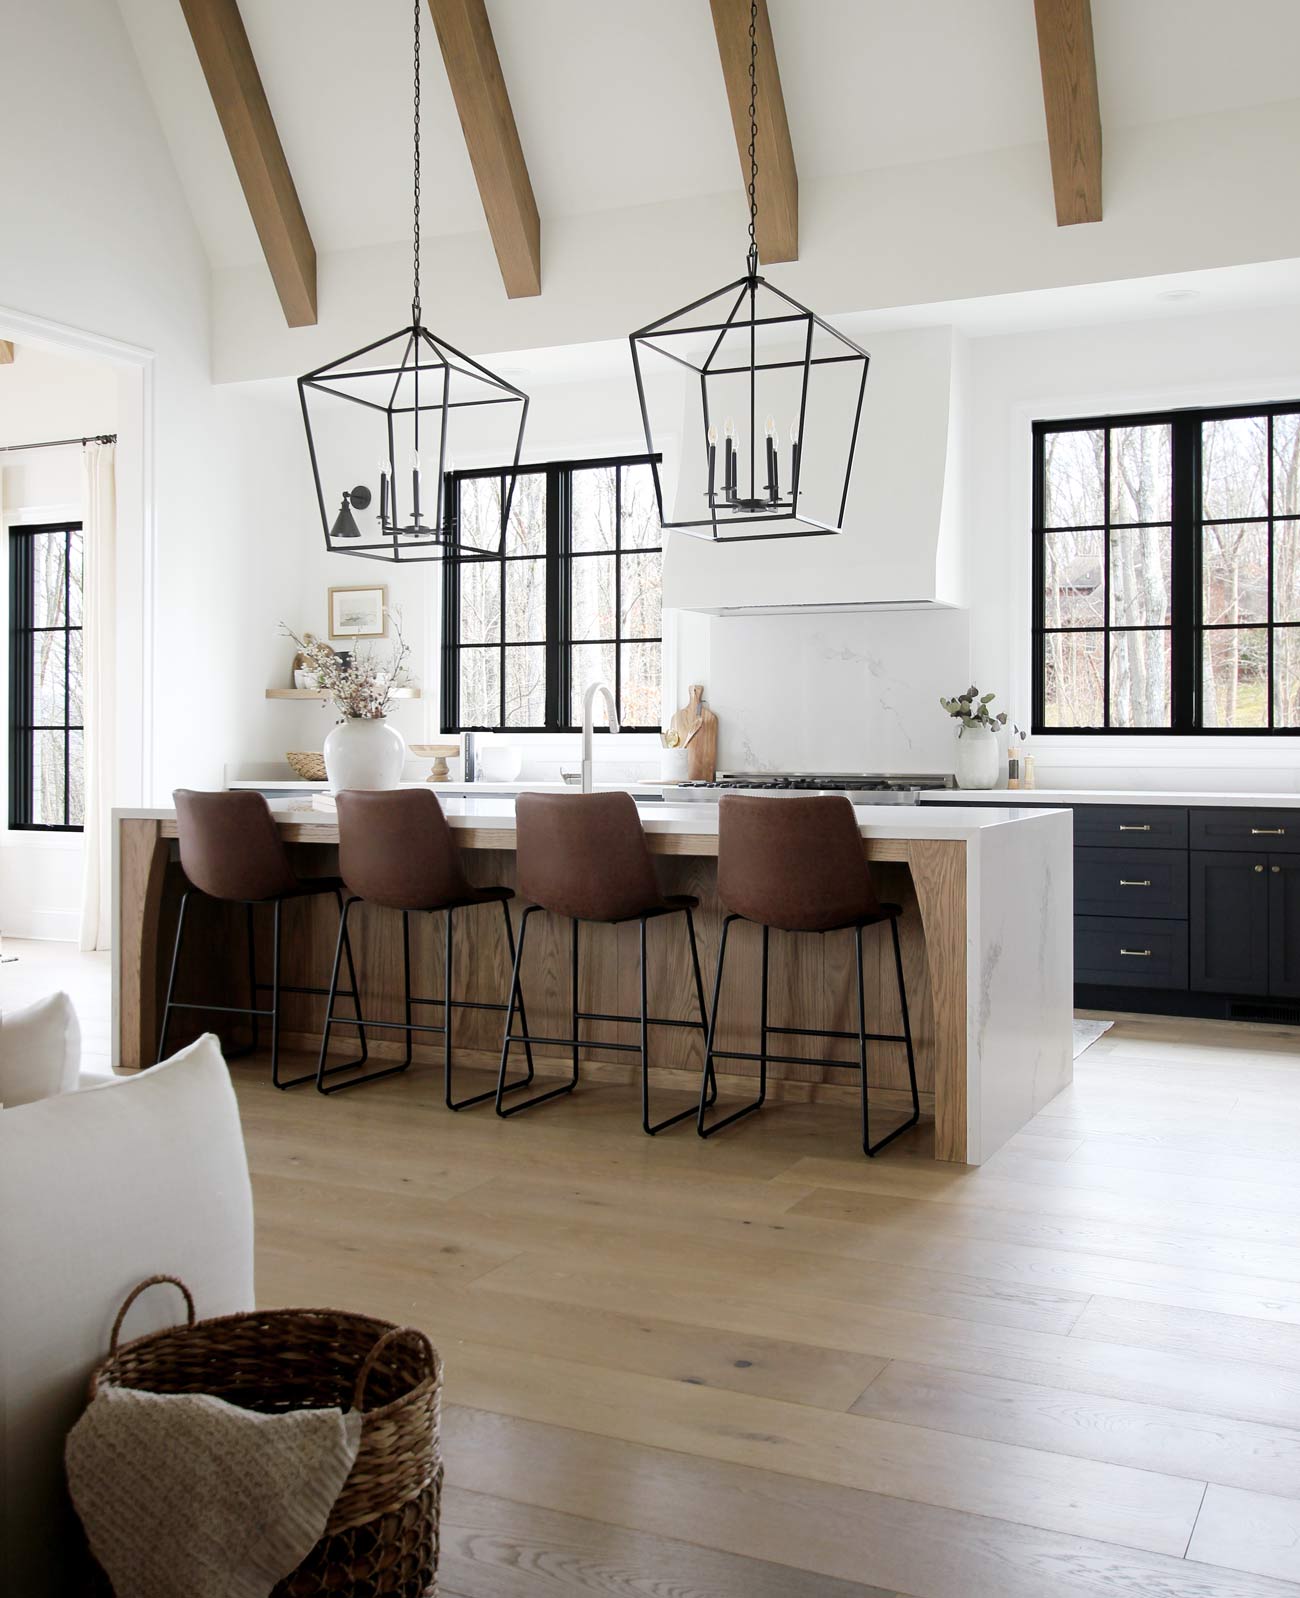
Room Sources: Island Pendant Lights
Ready to learn how to build a plaster hood? Let’s get started!
Step 1: Determine the Size of Your Plaster Range Hood
The first thing I did was to determine the size of my hood. The most obvious deciding factor is the size of your range. We went with a 48″ ZLINE gas range, which meant we would need a hood insert to accommodate that size of the range. We chose a 46″x21″ hood insert from ZLINE.
Another determining factor is the type of backsplash you will be doing. We knew we wanted a full height quartz backsplash and wanted it to be the same width as the finished hood, and wanted it to be a few inches wider than our range.

So the width of our hood framing ended up being 51 1/2″, and the depth was 23″. The height of the hood is determined by the height of your ceiling and the recommended distance from the bottom of the hood to the top of the range. Our ceiling height is 10′ and the recommended hood height is between 30″ and 36″. This gave us a height of 49″.
Step 2: Frame the Range Hood
There are two approaches you can take when framing your hood. You can put it all together and then mount it to the wall and ceiling. Or you can frame it in place on the wall.
Since I was working alone and didn’t have anyone to help me lift it into place, I decided to frame it in place.


I started with the bottom and top frames. I used 1×6 pieces of pine for the bottom and 1×4 pine for the top.

I glued and nailed them in place with a finish nailer. I added screws later to the framing where needed for added strength.

Next, I added vertical pieces of 1×4 to the sides to connect the top and bottom. I nailed and glued these into place as shown in the illustration above.

I then added a horizontal piece to each side with the front ends cut at a 12-degree angle. I connected the two with a piece across the front as shown in the illustration above. The vertical placement and length of these pieces will determine the amount of swoop on the front side of the hood.

Since 1x pine doesn’t bend very well, I decided to use MDF for the front pieces that created the swoop. I spaced seven pieces of 1×4 evenly across the front of the hood and nailed and glued them in place.

Once I had completed the above steps, I felt like the framing was sturdy, but for good measure, I added a few more pieces to beef it up.
Step 3: Install the Vent Hood Insert
As mentioned above, we chose the 46″x21″ hood insert from ZLINE which was very easy to install. But any insert of your choice should work. You can refer to the installation instructions that come with your vent hood insert. I won’t go into detail here since each one is different.
Step 4: Drywall
Since I don’t do drywall or have a desire to ever do it, I had the drywall crew go ahead and wrap the hood framing and finish it. This way I would have a nice and smooth foundation for the Venetian plaster.

Step 5: Venetian Plaster
I did a lot of research on what type of plaster to use for the hood. I finally decided on a product called Marmarino Piatto from Firmolux. You can get it tinted with almost any paint color. I chose the same color as our walls: Sherwin Williams Pure White. I ordered 1 gallon of Marmorino Piatto and 1 quart of Anchor Primer.
When applying plaster to drywall you have to use a special primer to help the plaster stick to the surface.

Before I applied the primer, I taped all of the edges around the hood and covered the range and countertops with plastic. Plasterwork can get messy.

To be honest, the drywall guys did such a great job, I felt bad applying plaster on top of it. But it was necessary to achieve the look we wanted.

Using a smooth roller, I applied an even coat of the primer, which is very thick and grainy. I let the primer dry overnight. The next day I started on the plaster.

I loaded up my hawk with plaster and went to work. Don’t be alarmed at the color. Wet plaster is much darker than its final color. Once it dries, it will be the color you ordered.
Since I wasn’t working with a large area, I opted for a large joint knife versus a trowel.
Tip: I recommend experimenting and practicing with the following technique on a scrap piece of drywall before applying it to your hood.

First I applied a base coat. Starting from the upper left corner of the side I was working on, I applied a thin coat by holding the knife at about a 15-degree angle. Then I increased the angle to about 30 degrees to spread the plaster with varying lengths of strokes. I reloaded my knife and repeated this until I had an even coat on all sides of the hood.
Tip: Periodically clean the dried plaster from your knife.

After the base coat had completely dried, it was time to apply a texture coat. I did this the same way as the base coat, but on the second pass with the knife, I used a skipping motion. This leaves subtle voids in the plaster and gives it texture.
If you want your vent hood to be more rustic, you can leave bigger voids.
Tip: Spend extra time on the corners to make sure they are nice and straight.
After the texture coat had completely dried, I burnished the surface. I did this with a clean joint knife held at a 30-degree angle. I went over the entire hood in circular motions. This gives the plaster a polished finish in areas.
I wiped off the entire hood with a damp cloth to remove any dust.
Step 6: Seal with Bee’s Wax
The final step is to apply a coat of bee’s wax to add a protective finish to the plaster after it has completely dried.

I poured some out onto a small board.
Then I used a clean cloth to wipe the bee’s wax onto the hood. I worked in small sections, wiping off any excess with another dry cloth. I did this until I had coated the entire hood.

Here’s a close-up shot to give you an idea of what the texture should look like.

Shop This Look


94 Comments
our builder won’t currently do a plaster hood for us and we’re thinking we don’t want to settle. would making one be possible after close? when kitchen is finished & cabinets are already in?
March 4, 2020 at 1:39 pmHello Sarah! Is there a reason he will not do a plaster hood for you? I was just curious. Is it possible for you to do one yourself during the building process? We had a contractor, but he allowed me to DIY anything that I wanted, for example the plaster hood and built-ins.
March 5, 2020 at 2:05 amWe are in the same boat with our builder. LOVE what you did! Thank you for sharing the steps. I will be trying to create the same thing in our home AFTER the home is finished. The builder is a basic tract home builder who won’t do anything extra and won’t let you in until it is finished or do projects. Hoping we can have this done after the fact. This is so helpful!
May 23, 2020 at 1:17 amHi! How do you find cleaning the plaster to be? Hoods can get greasy. Did you use a sealer? Thank you!
July 30, 2020 at 12:20 amWould love to know about cleaning as well. Any insights on how to best keep it clean? or does it not get dirty in the first place?
October 9, 2020 at 12:07 amI have the same concern as well! keeping the plaster hood looking clean and gorgeous after regular use. Any tips greatly appreciated.
December 7, 2020 at 8:53 pmGreat question. Can’t wait to hear the answer.
February 20, 2021 at 1:17 amDo you have an access panel?
August 18, 2022 at 2:43 pmHello, is there anyway you can show a close up picture of what the plaster looks like ? We are currently plastering our hood and the painter finished and there are blackish trowel marks it seems. Not what we were going for. Thanks
March 5, 2020 at 7:28 pmHey there Helga!
If you will dm on Instagram, I can send you a close up video.
March 9, 2020 at 2:50 pmHi Brooke
Could you pretty pls send me the up close video of the plaster as well?
March 29, 2020 at 5:22 pm@hayleyfeyter
Hey Brooke, could you also send me that close up video too if I dm you? We are just about at the stage of getting our range hood done as well and I’d love you see a bit of a closer look at the finish! Thank you so much!!
July 6, 2020 at 4:14 pmWould love that video! @mariefrancem
October 29, 2020 at 8:40 pmWe are looking for the same thing in a video to show our builder! Would love the video if you still have it available. @ashleybhenry
November 4, 2020 at 9:52 pmMy contractor is doing a plaster hood over a Wolf range. There is 32 inches between range and hood but my 6ft tall husband is afraid he’ll bump his head. How tall are you and what’s the distance between this hood and range? thanks!
April 21, 2022 at 1:07 amHi Brooke, we used your tutorial and are at the drywall is up! Are you able to send the video mentioned here still? I want to make sure we are on the same page as our contractor. Thank you so much!!
December 1, 2022 at 2:51 pmBlack Mark’s are from trowel, the burnishing coat. With venetian plaster you dont have to but it looks and is nice when you burnish your second coat.
March 13, 2021 at 11:08 pmGiving it a nice shine with lighting making the feature pop and appear much more.
Hi Henry! Thank you so much for such a thorough tutorial! May I ask how much this cost in material ?
March 5, 2020 at 10:25 pmHello!
Thank you for the kind words and I hope it was helpful to you! I think it was around $200 or so.
March 9, 2020 at 2:51 pmDid you drywall on the inside of the hood too or just paint some trim? We’re about to DIY something similar and trying to figure out the details of how the outside drywall transitions to the inside
April 9, 2020 at 6:23 amI added some wood to fill in around the insert. The drywall on the inside butted up against that. We painted the wood.
May 13, 2020 at 1:21 pmDid you insulate the external wall that the hood was on? My builder is saying I can’t do this hood because the wall has to be insulated…
April 15, 2021 at 11:09 amYes, we did. The hood doesn’t prevent you from insulating the wall.
April 15, 2021 at 11:22 amI would love to see a closer view of the hood. Could you please dm me some pics or video? We are getting ready to build a hood and I love this one. @laurahawthorne75
April 29, 2020 at 3:40 amAgain, thank you
Hi, thanks so much for this How-To! We are getting ready to build ours soon. For the Marmarino Piatto plaster – you said you can “get it tinted” with any paint color. Does this mean you had them mix it for you or did you mix it yourself? And if so, how much paint do you mix in with the plaster? Thanks!!!
May 10, 2020 at 1:58 amThey mix it. On their website you can choose pretty much any color.
May 13, 2020 at 1:22 pmOh, wow! that’s a helpful bit of news. It looks like they don’t offer the white that I need and the custom color is $50 per quart(!!!) versus the $60 per gallon un-tinted. Did you use the entire gallon? Can I get away with 3 quarts?
February 20, 2021 at 1:55 amHi Guys, one of my designers sent me this post featuring our FirmoLux Marmorino Piatto and Anchor Primer. Thanks for your endorsement, you are now part a large group of designers and professional plasterers that agree with your selection of Piatto.
May 19, 2020 at 8:23 pmYou’re welcome. You have a great product!
May 29, 2020 at 2:23 pmWould it be possible to do this on an already finished wall?
May 19, 2020 at 8:32 pmYes, but the framing will have be done a little differently.
May 29, 2020 at 2:25 pmI would also love a closer view / final product of the vent hood. Please send to @wa2shy
May 20, 2020 at 3:10 amThanks in advance
Hello,
May 29, 2020 at 1:07 pmSuch a lovely range hood. I am using yalls tutorial to build one in our own kitchen remodel right now. I am wondering why you did the last step of plaster, instead of just having dry wall guys finish it off smoothly. What’s the difference between the Venetian plaster and drywall? The drywall guy we hired is saying it’s the same exact thing, but I’m sure there is a reason y’all did the extra step of adding the Venetian plaster. 🙂
Thanks!
Thanks! The plaster gives it texture. In the tutorial I explain more about the texture coat. And the final step of burnishing gives it a polished look in places. These are the things that separate it from plain drywall.
May 29, 2020 at 2:28 pmOk thanks.
June 1, 2020 at 12:33 pmNext question 🙂 we just started building the frame last night…
So how does your insert actually sit/get supported by the frame since it’s 5” wider than the insert. Is your insert flush with the bottom of frame, or is it up in there a bit??
Would you explain briefly!
Also… when did you install your hood insert? Did you insert it then add supports to it?? I’ve read through your tutorial a few times, but these were the puzzling things as we actually built it last night. Thanks!!
The vent is up in the hood a couple of inches. All vents mount differently, but the one we used comes with brackets. Two on the back sat on a piece of wood running across the back and the two on the from sat on a piece of wood running across the front. Then I secured them with screws. Then filled in the gaps with primed wood that was later painted with Sherwin Williams Pure White. Hope that helps!
June 1, 2020 at 1:03 pmHello we are considering a drywall hood. I am wondering why you chose to do plaster instead of just painting the drywall. Does it achieve a different texture? If so, couldn’t you just do a different drywall texture? Or does the plaster give off a different sheen? Easier to clean? Our builder thinks the drywall is good enough…
June 13, 2020 at 12:37 amPlaster does have a diferent texture than drywall, and burnishing it creates areas that have some sheen.
July 5, 2020 at 7:03 pmSorry I didn’t notice the previous comment before I posted mine. I think that answered my question. Thanks for a great post. If you don’t mind, could you email me close up pictures of the texture compared to your drywall? I’ve scoured the Internet for some thing that will give me a reference to decide if we do want to go the extra step and play the plaster or if we will be happy with painted drywall. Also considering just doing a different drywall texture and painting it a different sheen so it looks different but it’s still a very similar color to the walls.
June 13, 2020 at 12:39 amHello! How would this work if we have a MDF venthood that was painted. Could I prime then apply the plaster over the paint?
Haleigh
June 15, 2020 at 5:17 pmYou should be able to apply the plaster to MDF just as you would to drywall, but yes, you would need to use the primer.
July 5, 2020 at 7:04 pmHello! This is a truly beautiful kitchen. You have inspired me to renovate my kitchen and to do the same hood. My dimensions are a bit different, so I chose a smaller insert. Just curious…if something goes wrong with that insert or the ducting above it, do you have any way to get to it? You can’t drop the insert back out because the ducting is rigid, correct?
July 17, 2020 at 11:16 pmI don’t believe there is a way to drop the insert back out. We went with a flexible duct, but either way, it is highly unlikley that anything could go wrong with the duct work if it is installed correctly. As for the vent, it can be repaired if something goes wrong with it without dropping it out.
July 18, 2020 at 3:39 pmHello! First and foremost, thank you so much for your posts! I’m in the process of building my custom house and your ADM Sea Smoke flooring suggestion turned out wonderful! Love love love my floors! Kitchen hood is next. Initially, we were planning to wrap it up with porcelain slabs but now are having second thoughts. From a practical stand point, how much dirt/ grease shows up on the plaster surface of your hood? If a lot, how easy it is to clean it, and don’t you think it might change its original color with time if you have to clean it quite often? Otherwise, it looks absolutely stunning! Would love to see your up close pictures of the texture of your hood, if possible!
July 18, 2020 at 12:21 pmHi. That’s great to hear about your floors! As for the hood getting dirty, our hood doesnt have one bit of grease or dirt on it. So we haven’t had to clean it at all. Maybe we are not very messy cooks, but I would imagine you would have to do some heavy deep frying to get grease on it, unless it was mounted very low.
July 18, 2020 at 3:45 pmForgot to add, I’ve been dragging my feet on the close up pics. I’ll try and take some today and add them to the article.
July 18, 2020 at 3:46 pmPerfect texture! Thank you, Henry! You guys are great helpers for everyone who follows you.
July 18, 2020 at 6:58 pmYou’re welcome. 🙂
July 22, 2020 at 1:24 amHi! Thank you for this tutorial. How is the MDF attached to the bottom and top pine boards? It looks flush but not sure how this is done without attaching behind the boards. Any advice would be greatly appreciated.
July 21, 2020 at 12:44 pmWondering the same thing! Great tutorial!
September 20, 2020 at 2:58 amHi! Thanks for the tutorial. My husband and I are going to attempt to build the range hood frame this weekend and are wondering how the curved MDF pieces attach to the top and bottom of the framing? They appear to meet up flush (instead of behind or in front of the framing) but we’re not sure how that was achieved. Any advice would be wonderful!
July 21, 2020 at 6:11 pmThat’s great! The MDF pieces are glued and nailed directly to the top of the bottom piece. I shot the nails at a slight angle down through the MDF into the top of the bottom piece.
July 22, 2020 at 1:24 amHi! We are building this same hood. Can you advise if you took the plaster to Sherman Williams and they tinted for you? I just called our local store in PC and they said tinting Venetian plaster can be tricky.
Thanks!
July 21, 2020 at 9:38 pmPC Fan
Hi Megan. That’s exciting. The place where I orderd the plaster from will tint it for you. You can read more about this in the first paragraph of step 5.
July 22, 2020 at 1:21 amWonderful tutorial, you’ve inspired us to try try this for our kitchen hood. Thank you. And if you can, will you post the video of the up close process.
August 20, 2020 at 12:53 amHi Henry! I’m curious how you chose the depth of the insert? We just ordered a Z-Line 36 inch gas range. Is there a reason you went with the 21 inch insert? We were thinking the 15″ or 18″. Probably the 18″. Our kitchen is smaller and we don’t have uppers. I’m just trying to envision what our hood would look like at 23″ deep? And if it’s really important to go that deep. Thank you so much!
August 24, 2020 at 9:07 pmHello! We are looking into doing this in our home 🤗 my question is did you have to tape and float after the drywall installation, or you put the primer directly into the raw drywall with the nails and all? Thank you so much!!
September 14, 2020 at 5:06 amWe did have the drywall guys fully finish the drywall, mainly to make my job easier, but they don’t have to. It would just require more work with the plaster.
September 20, 2020 at 1:50 pmHi Henry- first of all you made this look so easy! It turned out perfect. We are trying our hand at this. We have a 9 foot ceiling so was thinking maybe 38” for height??? Also, did the sheet rockers tape and do any mud first at all? Thank you and sorry if you answered this somewhere already!!
September 17, 2020 at 2:05 pmThanks! That sounds like a good height, but just make sure it’s within the effective distance from your range based on your range insert specs. We did have the drywall guys fully finish the drywall, mainly to make my job easier, but you don’t have to. It would just require more work with the plaster.
September 20, 2020 at 1:52 pmThank you for your amazing tutorial! We are currently using it to build our range hood and incorporating a walnut beam! Can you tell me specifically what you used to create the swoop in the front. We are having a hard time locating a flexible enough material. Thank you!
September 27, 2020 at 1:39 pmThat sounds great. We used 1×4 mdf boards.
November 4, 2020 at 9:56 pmHi Henry, thank you for all of the details and for answering all of these questions. Can you please tell me how you turn your vent on and off? Do you have a wall switch or is the on/off button on the front of the vent? The range hood my husband purchased is Electrolux EFT9033K, which I don’t think is typically covered, however it is unsightly. On this model I am not sure if I should extend the depth of the hood cover so that I could reach up and turn on the vent as the push buttons are on the front of the range. Thank you for your input!!! Love your blog.
September 30, 2020 at 11:10 amHi, I was wondering if this Zline insert comes with external blower or is it internal ? It s not mentioned in their website precisely. Thanks. I will be starting this project in a week.
October 16, 2020 at 3:04 pmBeautiful job! How did you get the edges so clean? I have one very similar to yours but it doesn’t look nearly as nice. My edges are crumbling in certain areas. 😫
October 25, 2020 at 5:16 amThis looks awesome. I’m curious how you’re going to manage moisture and a potential fire.
For moisture, wouldn’t the steam hit the hood and cause moisture over a prolonged period. Yes it’s a vent but moisture would get in there, no?
And for a fire, if you have a grease fire for example, isn’t the whole hood flammable (wood and drywall)?
Thanks!
October 26, 2020 at 5:10 amHow long is the wood that was placed 18.5″ down?
Also what angle did you cut the mdd pieces at in order to attach them to the bottom of the hood
December 5, 2020 at 11:26 pmWhat’s a MDF? You referred to it when the pine couldn’t bend. You used a MDF.
December 16, 2020 at 6:25 pmMedium density fiberboard… instead of wood.
January 8, 2021 at 1:02 amHi Marcie, it stands for medium density fiberboard and is much more flexible then wood
November 7, 2021 at 4:21 amCan you tell me how long it took to make the frame from start to finish? Thank you,
January 5, 2021 at 6:55 pmHi Henry, thanks so much for your posts. I am building a house and have learned so much from your projects which makes me feel so much more informed when dealing with our builder. Our cabinet maker built our hood and it now just needs to be drywalled and plastered. What would you say is an appropriate price range for this?
February 8, 2021 at 4:25 pmHi Henry
February 13, 2021 at 3:00 amCan you tell me is you hardwired the vent or did you plug it in. If you use a gfci plug and it trips no way to get to it. If the vibration eventually makes unplugs the vent you cant get to it. So Im thinking you placed a junction box and wired it in. Please confirm.
While this looks good I suspect this would be a disaster to clean and therefore making it impractical? Have you cooked under it yet? Had splatter of oil or steam up it yet? How do you plan on wiping it down?
February 20, 2021 at 7:52 pmHow come no one is answering the question about clean ability? This seems to be the most important concern if you actually cook and are not using your hood as decoration?
February 24, 2021 at 4:33 pmThank you so much for this tutorial. I am nearly finished with mine and followed your process. Great work!
Have you or anyone thought about using insulation inside the hood framing to help dampen the noise? We did a ZLine hood as well and it’s pretty loud.
March 18, 2021 at 6:33 pmHi Henry. I’m a designer, but also have done a lot of DYI work over 30+ years of home ownership. Just wanted to say how much I appreciate your well-crated documentation of your hood build! I wish I could hire you for my next client job where I want them to to consider a plaster hood–Haha! Now I have insight on how we might accomplish this…LOVE IT! Thank you!
March 30, 2021 at 10:47 pmI am doing this now in my home, just ordered the primer and plaster today. I love the detail in your posts. Great work! Thank-you!
April 20, 2021 at 5:01 amMy contractor says the hood cover has to have a panel that is removable – but many, including yours don’t. does installing the hood vent prior to finishing eliminate the need for a panel?
May 3, 2021 at 12:56 amLove love love this hood Henry. We are planning a plaster hood for our new build. My question is in terms of the final finishing. After the wipe down and polish, does a final product need to be applied to protect the plaster from grease etc? Also, how do you recommend cleaning the hood? any suggestions or troubleshooting to avoid our beautiful hood becoming greasy and dirty over time would be appreciated. Thank you so much! From Tracy in Alberta Canada:)
May 21, 2021 at 5:20 pmHenry & Brooke,
Thanks so much for posting these how-tos. We are looking to do a “hearth-style” range hood (re: katmarkerinteriors #brickbybrick client). When I showed sketches and pics to my builder, he said he was going to send it to the cabinet maker for bid, rather than framing. I thought that odd. I’m not looking fancy coving or arches, just straight up to the ceiling with niches/shelves on either side of range. What are your thoughts on this? I honestly feel like *I* could frame this after watching your videos!
June 11, 2021 at 2:40 pmCould this style also be done for a hanging range hood? Building an outdoor structure where a hood is required for code over the grill. The cabinetry is being finished with white plaster around stainless steel cabinets so was thinking that doing the hood in the same white plaster finish would help it to blend in more. Very eager to hear your thoughts. Thanks!
August 25, 2021 at 12:21 amI’m working on this now And wondering if part of the hood
August 25, 2021 at 10:43 pmOn the underside is covered in drywall/framing? Meaning the hood couldn’t be removed. I think ours would need to be partially covered like a 1” all the way around and not sure if that’s correct thanks!
Wow so happy I found your website, you are both so talented! Love the plaster hood in your beautiful kitchen. When thought of this type of hood I always thought it would be for a more Tuscan style house.. What style would you say your kitchen is? We are starting to remodel ours, and our house is fairly traditional/ranch style build I tend to like a bit more of a ‘polished’ look, we have built ins painted white, dark hardwood floors etc. Also are your walls and the vent painted the same color? Thank you in advance 🙂
September 8, 2021 at 2:42 pmThis is exactly what I was looking for! Perfect timing for our kitchen install and with your directions I think I can pull this off. Thanks!
September 24, 2021 at 11:41 amHello, very good post ! We bought the same z line unit you specified. Since it’s described as a wall mount range hood, I thought it would secure to the wall, but it does not. Can you describe how you mounted the z line unit to your box? It seems like it’s designed to rest on a piece of 1x on it’s side and screwed in from the top.
October 12, 2021 at 11:03 pmAgreed. The brackets seem useless for this application. How did you attach?
December 17, 2022 at 6:10 pmThank you for this tutorial! I absolutely love our hood and get so many compliments on it. At this point it’s just painted drywall but I was going to eventually plaster it. When I ordered my plaster a while back they only had it available in the quart size. My question is: how many quarts do you think you need or did you end up needing the while gallon?
February 2, 2022 at 12:01 amHi I’m working with a wood vent hood, can I plaster directly on the wood instead of sheet rock?
March 17, 2022 at 1:11 pmHello Tracy,
May 4, 2022 at 1:29 amI have exactly the same question. I trust myself to plaster the hood but not to build the frame. Have you decided what to do? Thank you, Kathrin
Hello Henry,
May 4, 2022 at 1:39 amYou did an incredible job in building the hood and telling us the secrets to the DIY. Thank you so much. A lot of us seem to be in the same boat – our builders just don’t like to do plaster hoods.
Could you please send me the closeup video of the plaster as so many asked already before me? I will forward it to our builder and if you can do it I hope they can do it as well and if not my husband and I will take you as inspiration and do it ourselves :)))
Could you please also tell me how much clearing you left between the hood and the range? It looks perfect.
Cheers, Kathrin
Hi!! I’d love to hear your review of your Z line range. I’ve read mixed reviews online. We are about to start a huge reno on a house we are buying. We like the looks of the z line. My husband is a chef and we cook a lot at home and our range gets used 3 times a day. I love to bake and I’ve heard it’s not very even temp in the oven. Let me know your experience!! Love you kitchen, it’s dreamy!!!
December 18, 2022 at 4:09 pmHenry, thank you so much for this! For both idea and how-to. Someone asked, and you commented that you added trim for the transition from drywall to interior space (at the base of the hood). From what I can see (and I zoomed in!), it’s a seamless and beautiful transition.
March 19, 2023 at 5:49 pmHere’s my question! The 1×6 pine bottom ‘box’ doesn’t leave much room to land a drywall piece on the bottom. Did you furr out the box at all? It looks fatter than 1x board. I’m just beginning the project, so hoping it looks as nice as yours!
Hi, Thank you for your post about the plaster hood vent. I am curious if (now after a few years) you have experienced any cracking or had to replaster any spots? I would like to do this in our kitchen in the next few months but wanted to ask how it was holding up. Thanks so much for teaching about the process, it’s beautiful.
September 29, 2023 at 1:57 pm