
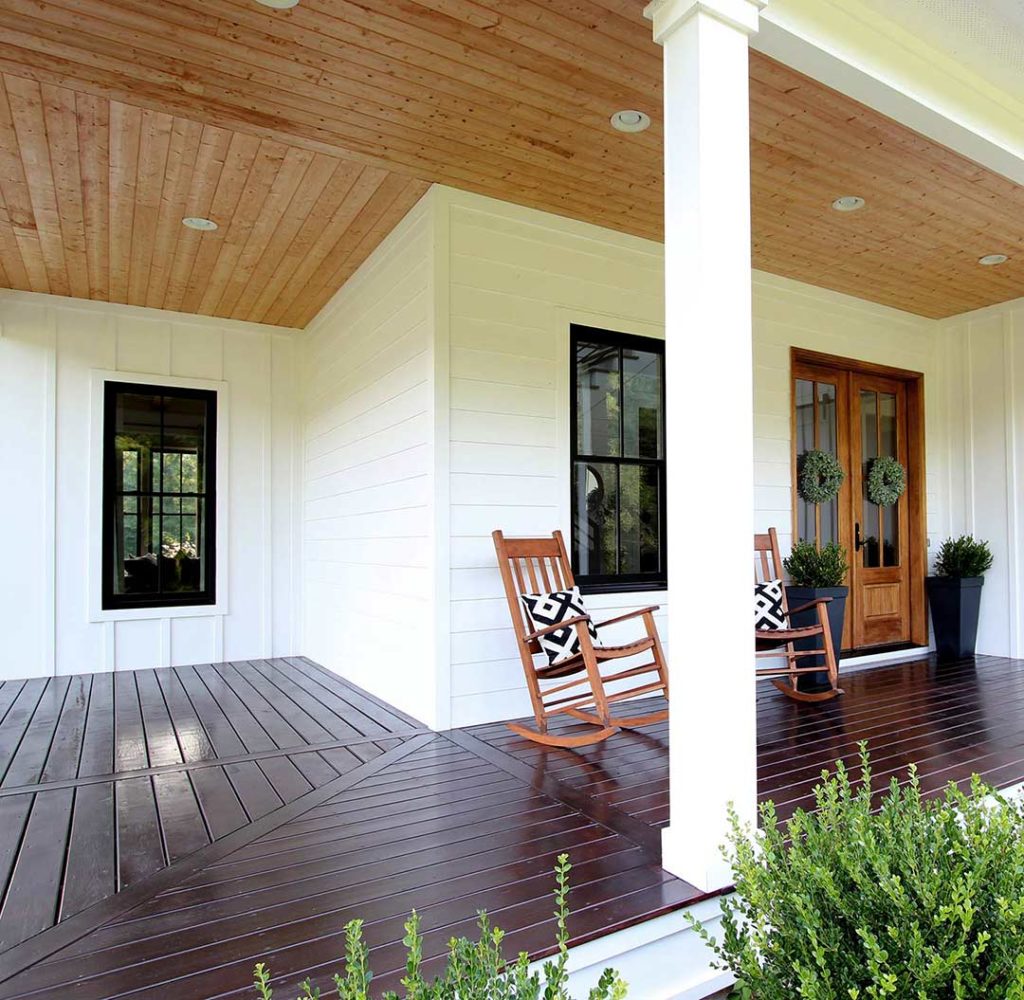
One of the most asked questions we continuously get is about our covered porch ceilings. We currently have tongue and groove porch ceilings and will be using the same on our new house. We love the look of adding natural wood elements where we can, and porch ceilings are the perfect place for it. It adds a warm authentic look that contrasts well creating great visual appeal.
A tongue and groove ceiling is made from wood planks that interlock edge-to-edge, creating a clean finished ceiling with visible wood texture. It is commonly used on porches, patios, vaulted ceilings, and interior rooms. On average, tongue and groove ceiling materials cost about $2–$6 per square foot, while installed projects often range from about $4–$10 per square foot depending on wood species, labor, finish, and ceiling complexity.
What is a tongue and groove ceiling?
Tongue and groove sometimes referred to as T&G are flat boards that have one protruding tongue side and one receiving groove side. The tongue and groove each run the entire perimeter of the piece, on all four sides. One board will fit into another adjoining each other. This process is actually pretty easy to DIY with little amount of gluing or nailing.
Finish Options
A tongue and Groove ceiling can be left natural, stained, or even painted. Each application will give a different look. It will depend on what look and feel you are trying to achieve. We had anticipated staining our current porch ceilings with a darker stain to somewhat match the flooring. But once it was all installed, we loved the unfinished look and decided to leave it. I had to get used to the fact that wood tones do not have to match or be the same color. In fact, I love the contrast!
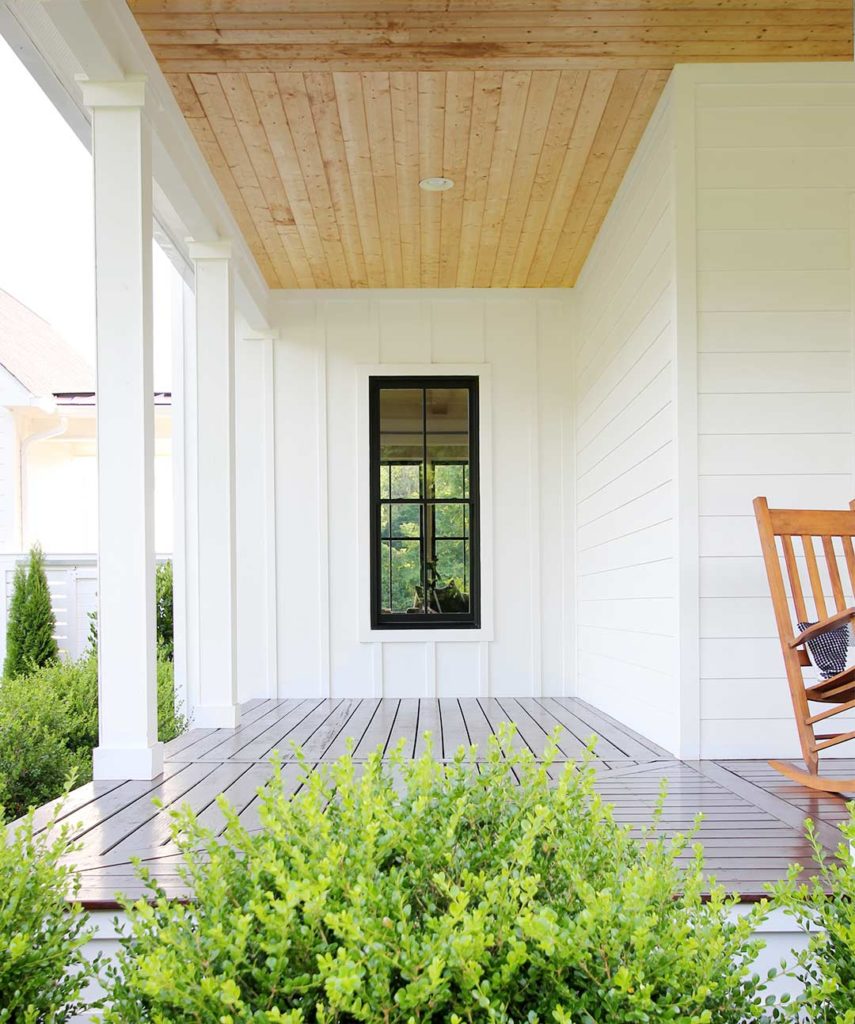
Staining a darker color probably gives off more of an elegant, classy vibe, while a lighter stain keeps it more rustic and natural. Painting is another option that looks great. I have noticed many Southern homes with light blue painted ceilings that look amazing and definitely fit that coastal cottage look.
Tongue and groove ceilings are a feature we frequently include in our custom home designs because they add warmth and visual interest to both indoor and outdoor spaces. If you’re planning a new build, explore our collection of house plans for additional inspiration.
Cost of Tongue and Groove Ceiling
| Project Size | Materials Only | Installed Estimate |
|---|---|---|
| 100 sq ft room | $200–$600 | $400–$1,000 |
| 160 sq ft porch | $320–$960 | $650–$1,600 |
| 300 sq ft porch | $600–$1,800 | $1,200–$3,000 |
So, we know the tongue and groove ceiling looks awesome, but the big question is it affordable?
The cost of a tongue and groove ceiling can vary depending on the type of wood you choose and whether you plan to install it yourself or hire a contractor. Material costs typically range from $2 to $8 per square foot, with knotty pine being one of the most affordable options and premium woods such as cedar costing more. If you hire a professional, installed costs generally range from $4 to $10 or more per square foot, depending on labor rates, ceiling height, and project complexity. Vaulted ceilings, custom finishes, and outdoor installations will typically increase the overall cost.
Porch Sources: Rockers | Planters
Our Project Cost
When we installed our tongue and groove porch ceiling, the material cost was approximately $780 for 300 square feet. Material prices have increased since then, so current project costs will vary depending on wood species, location, and labor rates.
Wood Species Comparison
While knotty pine is one of the most popular and affordable choices for tongue and groove ceilings, it is not the only option. Cedar, clear pine, cypress, and composite materials can all be used depending on your budget, desired appearance, and whether the ceiling will be installed indoors or outdoors. If you’re looking for more inspiration, check out our guide to porch ceiling ideas for additional materials, colors, and design examples.
| Wood Type | Best For | Look | Cost |
|---|---|---|---|
| Knotty pine | Budget porch ceilings | Rustic, warm | Lower |
| Clear pine | Cleaner interior look | Smooth, simple | Mid |
| Cedar | Outdoor porch ceilings | Rich, natural | Mid-high |
| Cypress/redwood | Outdoor moisture resistance | Premium | Higher |
| MDF/composite | Painted interiors | Smooth painted finish | Varies |
Tongue & Groove vs Shiplap Ceiling
While tongue and groove and shiplap ceilings can appear similar at first glance, they are constructed differently and create a slightly different finished look. Tongue and groove boards feature an interlocking system where the tongue of one board fits into the groove of the next, creating a tight, seamless connection. Shiplap boards, on the other hand, overlap one another with a rabbeted edge, leaving a more pronounced gap or shadow line between boards. Because of this design, tongue and groove ceilings often have a more refined and traditional appearance, while shiplap tends to create a more casual farmhouse-inspired look.
For ceilings, tongue and groove is often the preferred choice because the interlocking boards help keep the material aligned and provide a cleaner finished appearance. This can be especially beneficial on porch ceilings, vaulted ceilings, and other highly visible areas where you want the woodwork to feel intentional and architectural. Shiplap can still be a great option, particularly for painted ceilings or budget-conscious projects, but if you’re looking for a timeless wood ceiling with fewer visible seams, tongue and groove is typically worth the additional investment.
DIY Installation Tips
If you’re planning to install a tongue and groove ceiling yourself, taking the time to properly prepare the material can make the project go much more smoothly. Before installation, allow the boards to acclimate to the space for several days to minimize future expansion and contraction. It’s also a good idea to stain or seal the boards before installing them, especially for porch ceilings, since it can be difficult to fully finish the tongue and groove edges once the boards are in place. Be sure to locate and mark all ceiling joists before starting so each board can be securely fastened.
When installing the boards, begin along the straightest wall and check frequently to ensure each row remains aligned. Most tongue and groove planks are installed by nailing through the tongue at an angle, which helps conceal the fasteners once the next board is installed. A rubber mallet and tapping block can help pull boards together without damaging the edges. As you work, periodically step back and inspect the ceiling to ensure the joints remain tight and the board pattern looks consistent throughout the space. While the project can be completed by an experienced DIYer, working overhead for long periods can be physically demanding, so having an extra set of hands can make installation significantly easier.
FAQ’s
What is a tongue and groove ceiling?
A tongue and groove ceiling is made from wood planks that feature interlocking edges. The tongue on one board fits into the groove of the next, creating a tight, seamless appearance. Tongue and groove ceilings are commonly used in living rooms, vaulted ceilings, porches, and covered patios because they add warmth, texture, and architectural character.
How much does a tongue and groove ceiling cost?
The cost of a tongue and groove ceiling varies based on the wood species, ceiling size, and labor costs in your area. Material costs typically range from $2 to $8 per square foot, while professionally installed ceilings often cost between $4 and $10 or more per square foot. Premium woods, custom finishes, and vaulted ceilings can increase the overall project cost.
Is tongue and groove cheaper than drywall?
No, tongue and groove ceilings are generally more expensive than drywall. While drywall is often the most affordable ceiling finish, tongue and groove provides a more custom, high-end appearance that many homeowners feel is worth the additional cost. The added texture and warmth can dramatically improve the look of a room or porch.
Can you install tongue and groove over drywall?
Yes, tongue and groove can be installed over existing drywall in many situations. However, the boards should be securely fastened to ceiling joists or furring strips rather than relying solely on the drywall for support. Always follow the manufacturer’s installation recommendations for your specific product.
What kind of wood is best for a porch ceiling?
Knotty pine is one of the most popular and affordable options for porch ceilings, offering a warm and rustic appearance. Cedar is another excellent choice because of its natural resistance to moisture and insects. For covered porches, either option can provide beautiful results when properly sealed and maintained.
Should you stain or seal tongue and groove before installing?
Many professionals recommend staining or sealing tongue and groove boards before installation, especially for porch ceilings and other areas exposed to humidity. Finishing the boards beforehand helps protect all sides of the wood and can reduce the appearance of unfinished edges if the wood naturally expands or contracts over time.
Can tongue and groove be used outside?
Yes, tongue and groove can be used outdoors when the proper materials and finishes are selected. It is commonly installed on covered porches, patios, and outdoor living spaces. For best results, choose a wood species suitable for exterior use and apply a high-quality exterior stain or sealer to protect it from moisture and UV exposure.
Is tongue and groove better than shiplap for ceilings?
Both materials can look beautiful on a ceiling, but tongue and groove is often preferred because the interlocking boards create a tighter, more finished appearance. The design also helps keep boards aligned during installation. Shiplap can be a great option for achieving a farmhouse-inspired look, but tongue and groove is generally considered the more refined choice for ceilings.
What size boards are best for tongue and groove ceilings?
The best board size depends on the style of your home and the scale of the space. Many homeowners choose boards between 4 and 6 inches wide because they provide a balanced appearance without feeling too busy or too plain. Wider boards can create a more rustic look, while narrower boards often feel more traditional and detailed.


21 Comments
So beautiful! We’re considering this… Any concerns with weathering outdoors?
January 18, 2020 at 3:22 amHello Jordyn!
January 20, 2020 at 3:17 pmThank you so much! We haven’t had any issues with weathering, but I would recommend at least a clear coat of poly to protect it.
Beautiful! Would it be the same type of information if I wanted to install this indoors? Do you have a diy for inside?
February 22, 2020 at 9:28 pmAny chance you know the name of the white paint you used?
February 24, 2020 at 7:55 pmIt is Valspar Cream Delight.
September 1, 2020 at 7:02 pmWhere did you purchase your tongue and groove? Do you have any recommendations for online stores?
January 13, 2021 at 11:29 pmLooks fantastic. We have a similar porch and will be looking to do the same. We have 3 recessed lights, a hanging light for the the door and a ceiling fan which needs to be replaced. Did you find it difficult creating the holes for the lights and fan? Also, the fan you selected looks like exactly what we need to replace the old one. Where did you purchase this?
May 4, 2020 at 1:31 amDo you use screws at all?
May 4, 2020 at 9:35 amHello James! No, just a nail gun.
September 1, 2020 at 7:02 pmIts beautiful. I was wondering the white color as well.
June 2, 2020 at 1:08 amcan you tell me where to source your ceiling fans (and name/model)? Thanks!
August 22, 2020 at 3:27 pmHello Denise! I think we actually purchased them from Houzz.com
September 1, 2020 at 7:03 pmHey Henry, looks great. Is this ceiling stained or just a few coats of oil based poly?
Thanks!
August 30, 2020 at 2:07 pmHello Justin! We appreciate the kind comment. We actually meant to put a clear coat on the ceiling, but never did, but it does need it.
September 1, 2020 at 7:04 pmHow high is your porch ceiling? I love your fans and am wondering if mine is high enough.
September 9, 2020 at 1:43 pmIt’s 10 ft.
September 10, 2020 at 12:50 amHi Henry, can you tell me what poly you used, is it the water base or oil base satin or semi gloss? Appreciate your response- Thanks
March 20, 2021 at 2:55 pmHello. Everything looks so great! Does the porch ceiling have any stain or is it just coated with urethane? Thanks in advance.
September 25, 2020 at 10:46 amHi, what did you put on the ceiling? Thanks for replying.
January 5, 2021 at 3:38 pmHello, wondering if this is white pine or yellow pine?
August 26, 2021 at 12:18 amDid you use 4inch boards?
August 19, 2022 at 11:39 pm