
Rendering has always been one of the most time-consuming parts of architectural design. Traditional tools require complicated lighting setups, scene building, and long wait times just to get a single visual.
ArchRender flips that workflow on its head by letting you turn your designs into photorealistic imagery using the files you already have , no lighting setups, no rendering engines, no GPU workstation required.
Below, we’ll walk through exactly how to create an exterior or interior render directly inside ArchRender.
Step 1: Create a New Project
When you load Render Mode, new project is automatically created for you.
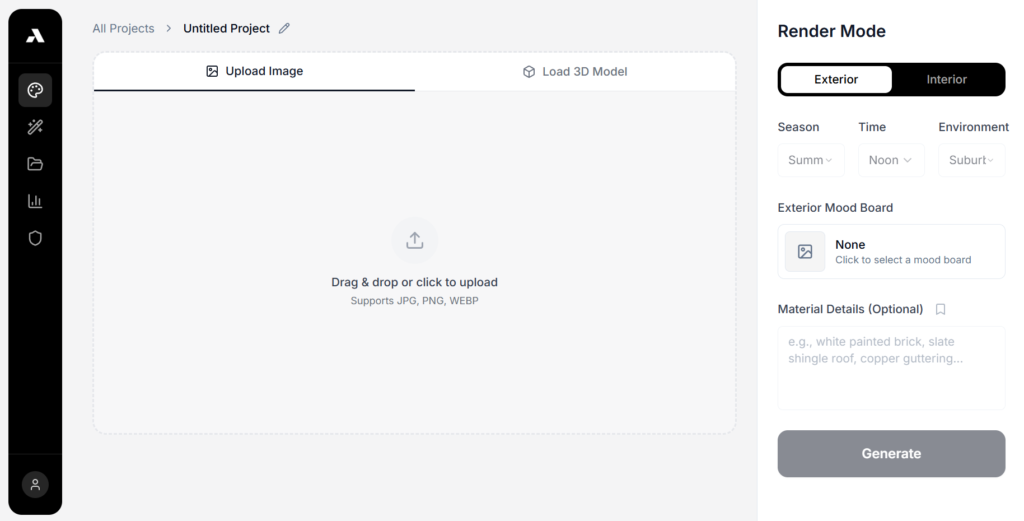
At the top, you’ll see two starting points:
• Upload Image
• Load 3D Model
Pick whichever fits your workflow.
Step 2: Choose Your Input
ArchRender supports two ways to start a render:
Option A: Upload a 2D Export
This is ideal if you already have a view you like from your architectural software, like Revit or Sketchup.
You can upload:
• Shaded views
• Hidden line views
• Concept style exports
• Screenshots from your 3D viewport
Formats supported: JPG, PNG, WEBP
Just drag and drop, or click upload.
Option B: Load a 3D Model
If you want full control of your camera angle, upload a 3D file instead.
Supported formats include:
• .fbx
• .obj
• .glb
Once uploaded, you can orbit around your model and select the exact angle you want to render. There are also other camera controls that allow you to change the FOV and aspect ratio.

Step 3: Choose Exterior or Interior Mode
In the right-hand panel, select your render mode:
• Exterior — for house exteriors, curb appeal perspectives, backyard elevations
• Interior — for inside spaces (available when your model includes interiors)
Switch between them anytime.
Step 4: Select Your Environment
Use the dropdowns to control the overall mood and atmosphere:
• Season (Summer, Winter, etc.)
• Time of Day (Noon, Golden Hour, Dusk, etc.)
• Environment (Suburban, Country, Forest, etc.)
These settings automatically adjust lighting, shadows, and sky tone. No manual work required.
Step 5: Add Style Direction (Optional)
You can guide ArchRender in two optional ways:
Mood Board Upload
Click to upload a moodboard. This should be a premade image that contains your desired materials, colors, lighting, etc. Like the image below:
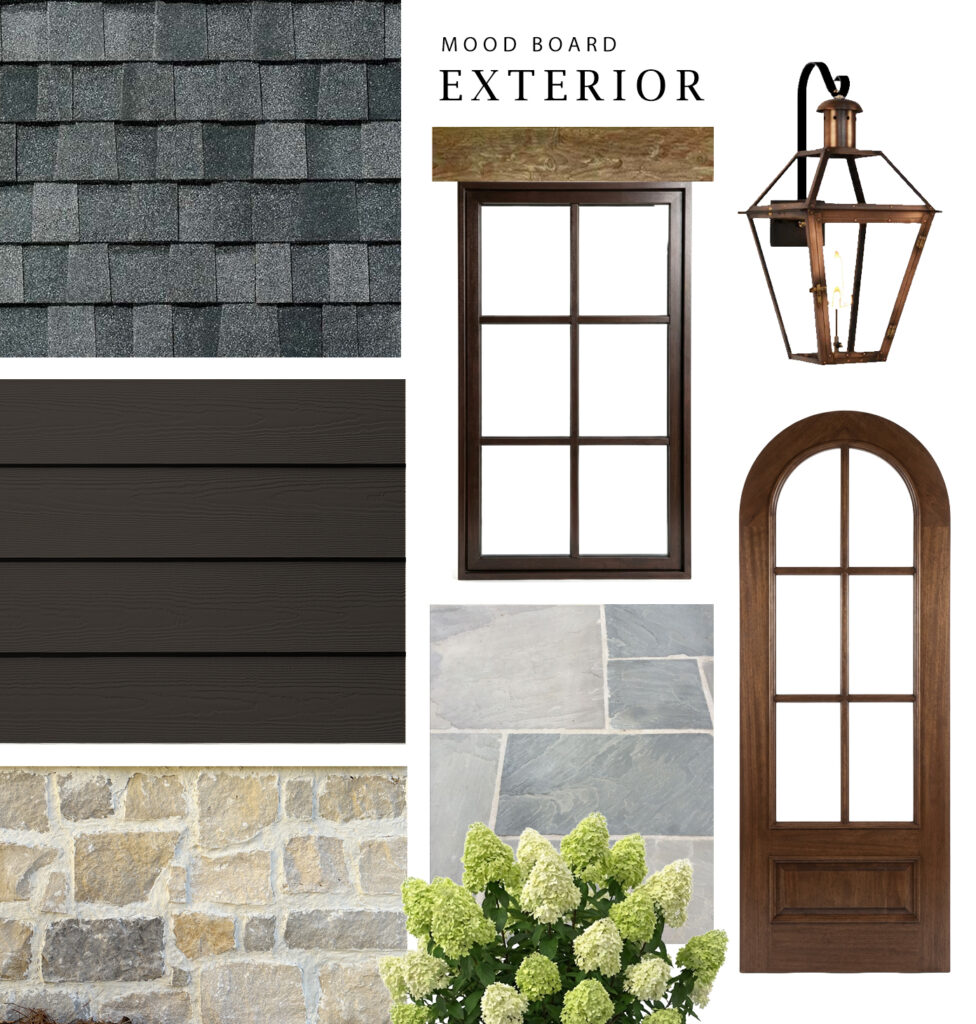
ArchRender uses this to align colors and materials and even objects such as lighting.
Material Details
Here you can enter all of the materials you would like to use in the render, and describe other details that will help guide the AI.
Example: white painted brick, white windows, white siding, weathered cedar shake roof, copper guttering
Both the mood board and description are optional, but it’s recommended that you use them for the best results.
Step 6: Generate Your Render
Click Generate and ArchRender takes care of the hard parts:
• Lighting simulation
• Materials and depth interpretation
• Environment + sky context
• Photoreal finishing
Most renders take between 10-20 seconds.

Step 7: Explore Variations
Once you have your first render, experiment:
• Try a different view angle
• Change season or lighting
• Add (or remove) material notes
• Test a new mood board
• Switch from exterior to interior mode
Every variation saves inside your project. No files get lost, and you don’t need to re-upload.
Step 8: Download and Use
Download your finished render to use in:
• Client presentations
• Social media posts
• Portfolio pages
• Builder or real estate marketing
• Plan books and spec sheets
• Website galleries
You can return and download any version at any time.

Why Use ArchRender for House Plan Rendering?
Traditional tools:
• Require constant scene setup
• Demand expensive hardware
• Have steep learning curves
• Take hours per render
ArchRender:
• Uses your existing work
• Requires no lighting setup
• Works on any device
• Produces photoreal results faster
• Lets you explore more ideas in less time
Whether you export a shaded screenshot or upload a full 3D model, ArchRender turns design files into polished visualizations…fast.
Final Thoughts
Architectural rendering software shouldn’t slow down your design and visualization process. With ArchRender, you can go from design to visual in minutes, without rebuilding scenes or fighting a complex rendering workflow.
If you’re ready to try it out, start your first project today at ArchRender.ai.
No Comments