
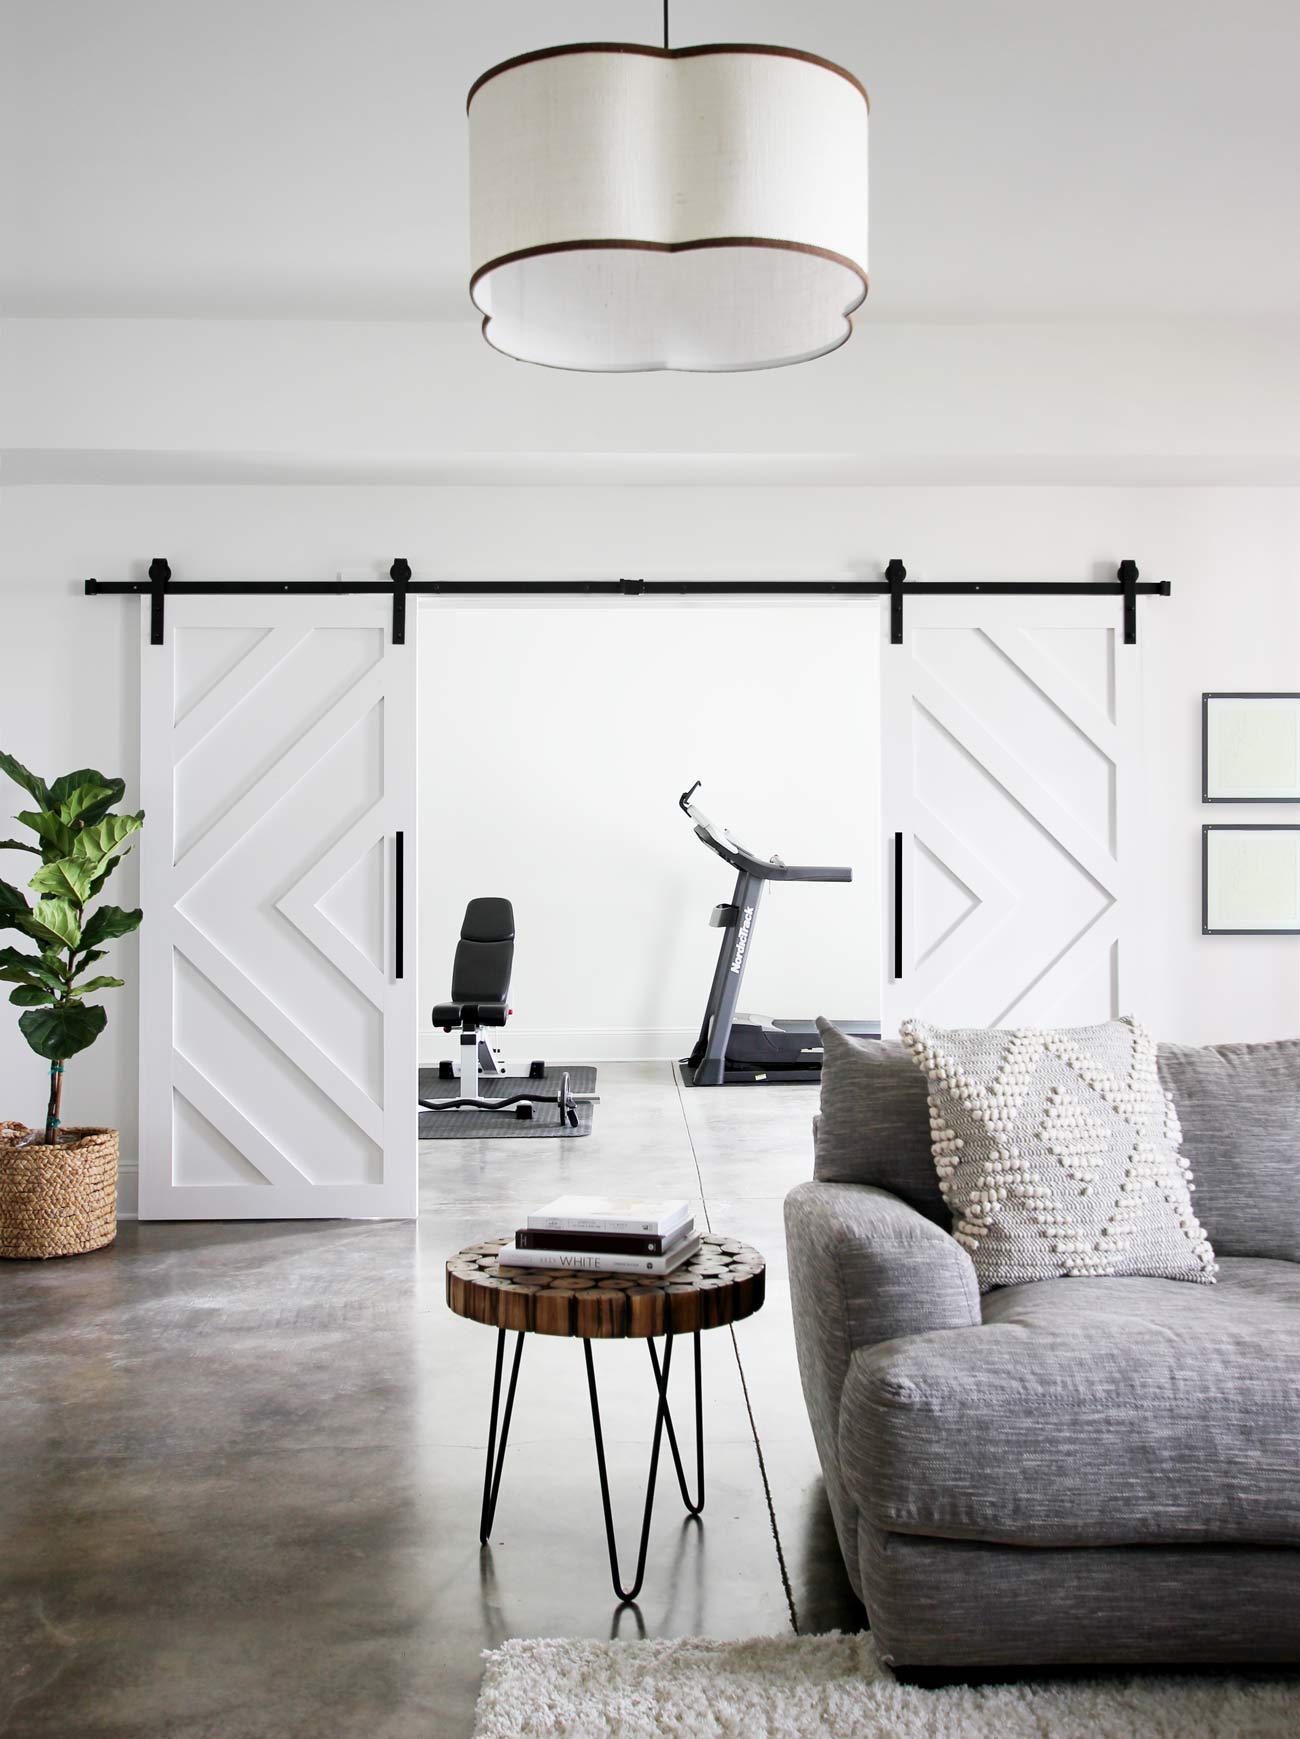
In our basement, we have a rec room with a cased opening leading to a work out room. We wanted a way to close off the workout room when needed. So we decided on double barn doors.
Our basement already had a bit of a modern vibe with the acid stained concrete floors. Because of this, I thought it would be fitting to come up with a modern design for the barn doors.
In this article, I’m going to show you how I built and installed these modern barn doors.
What You’ll Need
- Finish Nailer
- 1 1/4″ finish nails
- tape measure
- clamps
- miter saw
- wood glue
- 8 primed 1×4″x8′ boards
- 6 primed 1×2″x8′ boards
- 2 sheets of 3/4″ MDF or plywood
- 2 Barn door hardware kits
Step 1: Determine the Size of Your Doors
The first thing I did was determine how big the doors needed to be. I measured the opening and divided it by two. Then I added on 1″ to allow for some overhang on the sides.
Once I had the size nailed down, I designed my doors. Here’s what I came up with:

Step 2: Build the Doors
For the core of the door, I used a 3/4″ piece of MDF. You can also use plywood. I chose MDF because it has a smoother finish and its more affordable. You can have it cut to size at your home improvement store where you buy it.

I started by gluing and nailing the top and bottom pieces of 1×4 to the MDF.


Sometimes glue will cause the board to slide as you are nailing. So I used clamps on these pieces to make sure they were held in the right place while I was nailing them.


Next, I glued and nailed on the side pieces.

Then I measured and marked the halfway point to know where to start my inside pieces of 1×4. All of the ends of the inside pieces are cut at 45-degree angles.


I measured, cut, and added the remaining 4 inside pieces using the dimensions in the diagram above.

To hide the seam between the MDF and 1x4s on the side of the door, I added a piece of 1×2 all the way around sides, top, and bottom. I cut the ends and a 45-degree angle.
Step 3: Fill Holes, Sand, and Paint
After I built both of the doors, I filled all of the nail holes with spackling and gave it time to dry.


Then I sanded all of the spackled holes plus all of the corners and sharp edges.

We decided to paint the doors with Sherwin Williams Pure White, which is one of the best white paint colors. I used a foam roller to get a smoother finish and used a brush in some of the tighter areas on the door.
Step 4: Install Hardware

First, I measured and marked 6 3/4″ from the top of the door. This mark indicated where I would place the bottom of the hanger.

I placed the hanger on the barn door so that the bottom lined up with the mark. Then I marked both holes.

I drilled small pilot holes on each mark. Then used a 1/2″ drill bit to drill bigger holes.

Once I had drilled all 4 holes in each barn door, I attached the hangers using the supplied bolts.
Step 5: Hang the Barn Doors
Since this project involved two doors, this meant I would need two hardware kits. I ordered two 72″ kits. I marked the middle of the door opening and mounted each track from that point and centered them vertically in the middle of the top molding.
The tracks come predrilled. I held each track in place and marked my holes.

I drilled pilot holes on each mark.

With spacer behind the track, I screwed in each bolt. Make sure that you are screwing into a stud. We planned ahead and had the framers add blocking in the wall where we knew the barn door track would be.

After I had both tracks installed, I lifted each door onto the tracks and added the supplied stoppers on each end.
We couldn’t be happier with the way they turned out and what they added to our basement.
Shop This Look


17 Comments
This is so beautiful! Thank you for the step by step instructions. Is there anyway you can link the hardware you used?
April 4, 2020 at 12:15 amThanks and you’re welcome! I’ve added the link to the materials list.
April 4, 2020 at 7:18 pmAny instructions you say to gets 6 1x2s however you are using 1×4 for the inserts in the doors so mine did not come out the same… Please update your material instruction list
July 18, 2020 at 6:16 pmThe instructions are correct. The 1x2s are used in the very last part of step 2 to go around the outside edges of the doors.
July 18, 2020 at 6:33 pmLooks so great! Can you link the hardware you used?
April 4, 2020 at 4:51 pmThanks! I’ve added the link to the materials list.
April 4, 2020 at 7:18 pmGreat !
April 6, 2020 at 10:49 amYou were using a software to get the wood length / dimensions etc… What software is that ?
Thanks! We use SketchUp.
April 7, 2020 at 3:14 amhow do you stop the doors at the middle and not crossing over to the other side
December 25, 2020 at 7:38 pmUnrelated to this build (looks great btw), but how tall is your basement ceiling height??
April 16, 2020 at 4:38 pmThank you! They are 9 ft but there are a couple of sections that come down to 8t for the duct work.
April 17, 2020 at 2:00 amBeautiful Doors! I LOVE the modern design!! I’ve suggested using plywood or MDF to my husband before but he’s afraid they might warp over time. Have you had any issues, yet? He’s very handy & has built so many Pinterest projects for me, so I am praying y’all haven’t!!
June 10, 2020 at 1:50 pmAND did you do the “design” on both sides or just the one?? Thanks so much for responding!!
I can’t wait to get ours built!! They do not make the size we are needing & having them custom made was insane!
Thanks!! That’s great that you have a handy husband. We’ve not seen any warping in the doors, and backside of the doors are just flat.
June 10, 2020 at 11:19 pmHiHenry and Brooke! Love your blog! So glad I found it! I want to make a door for my master bath. Tried the Sketchup but having difficulty. Any chance you could help me with the measurements for one door that would be 42 inches wide and 84 inches long?
July 24, 2020 at 2:04 amHi, I’m just wondering how to get the dimensions for the inside pieces to make the triangles?
August 3, 2020 at 6:45 pmHello,
This is really beautiful!! Ya’ll did an amazing job and the space looks fab! Did you use all MDF for your material and can I ask how much it cost to build both doors of that size?
Thank you,
Cindy
October 24, 2020 at 6:46 pmHi, Such a great article.
November 1, 2020 at 7:23 pmthe 4X1 and 2X1, is that pine?
Thanks