
How to Build a Porch Swing Bed
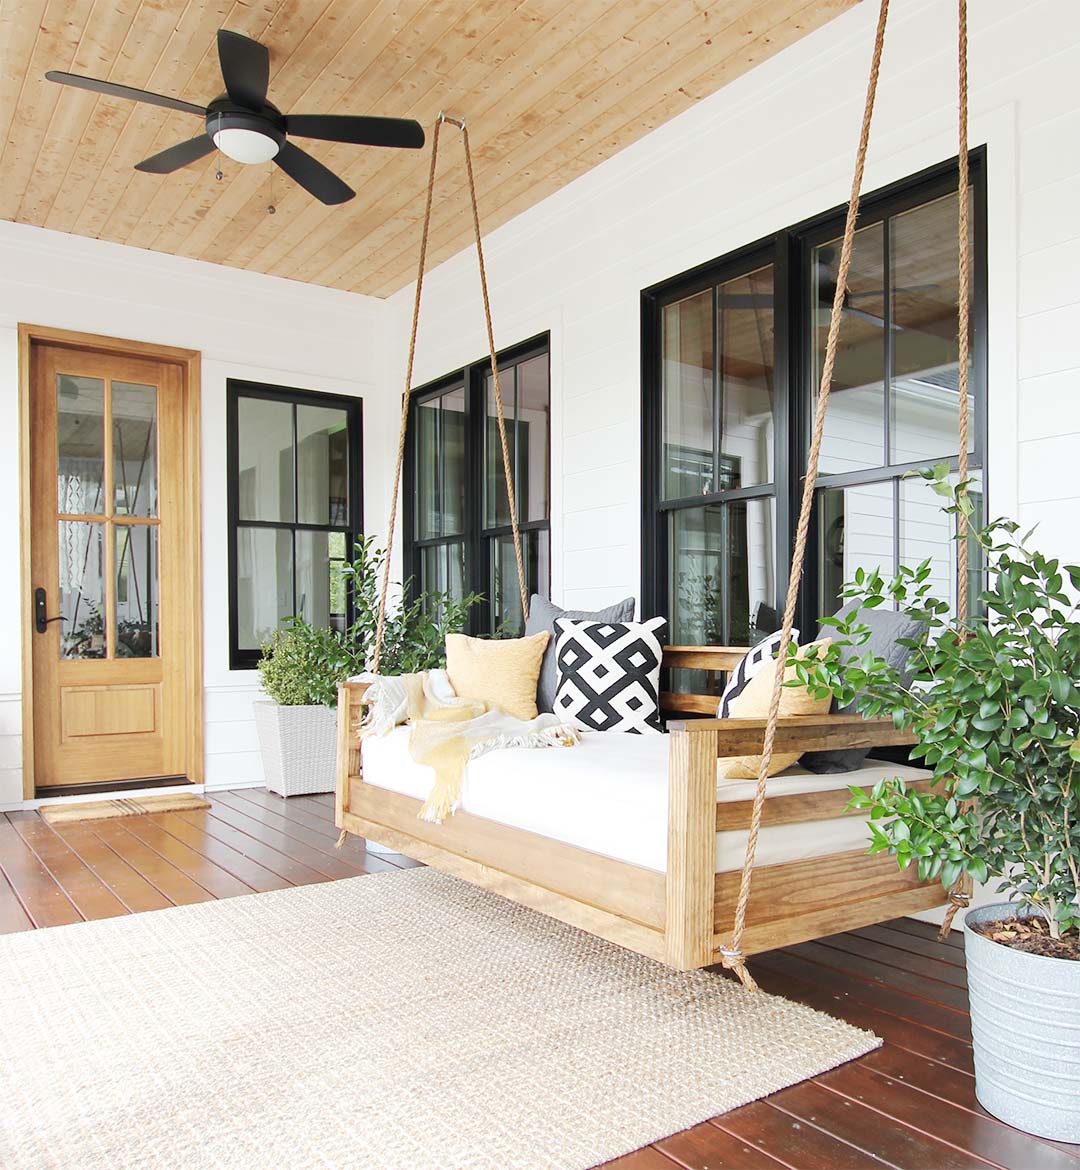
A porch swing bed is one of those projects that completely transforms a porch. Not only does it create a comfortable place to relax, read, or take an afternoon nap, but it also becomes a focal point that guests immediately notice.
A porch swing bed is one of those projects that completely transforms a porch. Whether you’re creating a cozy cottage-style retreat or upgrading a larger covered porch, it’s one of the easiest ways to make an outdoor space feel more inviting. If you’re still planning your porch design, you may also enjoy our ideas for front porch decorating and porch ceiling design inspiration.
In this tutorial, I’m going to show you how to build a simple yet beautiful porch swing bed using materials you can find at your local Lowe’s Home Improvement store. This design features clean lines, beginner-friendly construction, and a timeless look that works well with farmhouse, cottage, and traditional homes.
I’ve built several porch swing beds over the years, and no two have ever been exactly alike. One of my favorite parts of the process is coming up with new designs and finding ways to customize them for different spaces. If you’re looking for additional inspiration, be sure to check out our other porch swing plans, including this alternative design and our modern porch swing bed plans.
If you’re planning to build this swing, I highly recommend grabbing our printable plans. They include detailed measurements, cut lists, step-by-step instructions, and the complete SketchUp 3D model to make the build process even easier.
For this particular build, I wanted to create something that was affordable, easy to build, and approachable for beginners. I was able to build this porch swing bed for around $200 using materials from Lowe’s, although your final cost may vary depending on lumber prices and the type of wood you choose.
And if I’m being completely honest, porch swing beds are one of my favorite things to build for two reasons. First, they’re absolute showstoppers that tend to make me look far more talented than I actually am. Second, they’re perfect for taking naps. Anything that encourages more nap time has to be a good thing.

Project Overview
Difficulty: Beginner to Intermediate
Build Time: 1–2 Days
Estimated Cost: $200–$900+
Finished Size: Twin Mattress
Recommended Porch Depth: 8 Feet or Greater
Best Wood Options: Pine, Cedar, or Cypress
Tools Required: Miter Saw, Drill, Pocket Hole Jig, Sander, Measuring Tape, Clamps
Before you start building, there are a few important decisions to make, including what size swing bed to build, what type of wood to use, and how much weight your porch structure can safely support.
What Size Porch Swing Bed Should You Build?
One of the most important decisions you’ll make before starting your project is determining the right size porch swing bed for your space. While larger swing beds provide more room for lounging, they also require a deeper porch and stronger support structure.
| Mattress Size | Typical Swing Bed Size | Recommended Porch Depth |
|---|---|---|
| Crib Mattress | 30″ x 54″ | 6’+ |
| Twin Mattress | 39″ x 75″ | 8’+ |
| Twin XL Mattress | 39″ x 80″ | 8’+ |
| Full Mattress | 54″ x 75″ | 10’+ |
For this tutorial, we built our porch swing bed to accommodate a standard twin mattress. A twin-size swing bed provides plenty of room for relaxing while fitting comfortably on most covered porches.
Before choosing a size, be sure to measure your porch carefully and leave enough clearance around the swing bed so it can move freely without hitting walls, columns, or railings.
How Much Does It Cost to Build a Porch Swing Bed?
The cost of building a porch swing bed can vary significantly depending on the materials you choose and whether you already own the necessary tools.
Budget Build (Pine): $250–$400
Mid-Range Build (Cedar): $450–$700
Premium Build (Cypress or Hardwood): $700–$1,200+
Pressure-treated pine is typically the most affordable option and works well when properly sealed and maintained. Cedar and cypress naturally resist moisture and insects, making them excellent choices for covered outdoor spaces.
In addition to lumber, be sure to budget for hanging hardware, rope or chain, exterior-grade fasteners, stain or paint, and an outdoor mattress if you don’t already have one.
How Much Weight Can a Porch Swing Bed Hold?
A properly built porch swing bed can safely support several hundred pounds, but the overall weight capacity depends on both the swing bed construction and the structure it’s attached to.
Most twin-size porch swing beds are designed to support between 500 and 800 pounds when properly installed. However, the limiting factor is often the porch structure itself rather than the swing bed frame.
Before hanging your swing bed, verify that:
- The support points are attached directly to structural ceiling joists.
- The joists are capable of supporting dynamic loads.
- Exterior-rated hardware is used throughout.
- Rope, chain, and fasteners exceed the expected load requirements.
If you’re unsure about your porch structure, consult a qualified contractor before installation.
What Is the Best Wood for a Porch Swing Bed?
The best wood for a porch swing bed depends on your budget, climate, and desired appearance.
Pine
- Most affordable option
- Easy to work with
- Requires proper sealing and maintenance
Cedar
- Naturally resistant to insects and moisture
- Beautiful grain and color
- Popular choice for outdoor furniture
Cypress
- Extremely durable outdoors
- Naturally rot resistant
- Excellent long-term investment
For most homeowners, cedar offers the best balance of durability, appearance, and cost.
Before You Build: Plan Your Porch Swing Bed Location
Before purchasing materials, take time to determine the best location for your porch swing bed.
Ideally, the swing bed should have at least 18–24 inches of clearance from nearby walls, columns, and railings. You’ll also want to ensure there is adequate room for the swing bed to move naturally without obstruction.
Consider how you’ll use the space throughout the year. Positioning the swing bed to take advantage of views, breezes, and natural light can make the porch feel even more inviting.
A little planning upfront can help ensure your finished porch swing bed feels like a natural extension of your outdoor living space.
Materials
- Finish Nailer
- Tape Measurer
- Wood Glue
- Wood Stain
- Wood Filler
- Miter Saw
- Sand Paper
- Jig Saw
- 4 Eye Screws
- 1 1/4″ Finish Nails
- 2″ Finish Nails
Wood
- 3 pieces of 1″ x 8″ x 8′ clear pine
- 12 pieces of 1″ x 3″ x 8′ clear pine
- 1 piece of 1″ x 4″ x 8′ clear pine
- 2 pieces of 2″ x 3″ x 8′ framing lumber
- 1 piece of 2″ x 4″ x 8′ framing lumber
- 4 pieces of 1″ x 6″ x 8′ knotty pine
I tried to keep everything as simple as possible. So all joints in this build are butt joints. And in case I forget to mention it anywhere in this tutorial, assume that everywhere there is a joint or two pieces of wood meet, apply some wood glue.
Step 1: Build the Porch Swing Bed Frame
For this porch swing bed, I started off by building the main bed frame out of the 1×8’s. You can find the measurements in the illustration. On these joints, I used 2″ finish nails.

Then I added an inner frame for support and something to nail the bed slats to. On the sides, I used 2×4’s for some extra bulk since this is where the eye screws will go through. I made sure the bottom of the 2×4’s were flush with the bottom of the frame. Then I nailed and glued them onto the inside of the frame using 2″ nails. For the front and back, I used 2×3’s making sure the top was even with the top of the 2×4’s.

For the slats, I cut 8 39″ long pieces of the 1×6 knotty pine and spaced them out 4 1/2″ evenly along the inside of the bed frame as seen below and nailed them in place. This will be the support for the mattress.


Step 2: Build the Posts
Then I constructed 4 posts out of the 1×3 clear pine, one for each corner.


Each post is made from two pieces. I applied a bead of glue down one edge.

I placed the other piece on top of the glued edge to form an “L” shape and made sure the edges were perfectly lined up. Then I nailed the two pieces together with 2″ nails.

Then I attached each post to the corners with glue and 1 1/4″ nails.

Step 3: Add the Rails
After all four posts were in place, I cut all of the rails. These are the horizontal pieces that connect all of the posts. I attached all of the back rails first. Then the side rails. Refer to the illustration below for lengths and spacing.

As I mentioned earlier, I really wanted to design this swing to be super simple to build with only straight cuts that could be done with the miter saw, but then I got to the armrest pieces which required a little extra cutting. I first cut each arm piece to length from a piece of 1×3. Then I had to use a jigsaw to cut out a notch for it to fit around the back post as you can see below.


After I finished these cuts, I glued and nailed them in place as shown in the illustration. Then I added 1×3 trim around the bottom of the swing on all four sides using glue and 1 1/4″ nails.

The final step in the building process was adding the top to the back and a middle rail support. For the top piece, I used 1×4 and for the middle support, I used 1×3.


Step 4: Fill Holes and Stain
I filled all holes with wood putty and to round off the corners a bit and get rid of any splinters I sanded the swing with fine sandpaper. I then applied a coat of stain and three coats of polyurethane. Even though the swing won’t be in direct weather, I wanted to give it a little extra protection.

Step 5: Add the Eye Screws
Once everything was dry. It was time to add the eye screws. The rope will run through these and hold up the swing. I measured 1″ from the edge of the post, and 1 1/4″ up from the bottom, which put me in the middle of the bottom trim piece. Then I drilled my hole for the eye screw and screwed it in.


And that’s it. When you hang your swing, you’ll use the same eye screws in the ceiling. You just need to make sure that you are screwing into ceiling joists. For the cushion, any twin mattress should work, and you can order a custom mattress cover here. Then you can finish it off with some pillows.

Once you’re finished with your swing, you can follow my instructions on how to hang a porch swing.
I hope you found this tutorial useful, and if you have any questions, please leave a comment below.
Frequently Asked Questions
What size mattress should I use for a porch swing bed?
A twin mattress is the most popular option because it provides plenty of room for relaxing while fitting comfortably on most covered porches. Larger mattresses may require additional structural support and more porch depth.
What is the best wood for a porch swing bed?
Pine, cedar, and cypress are all popular choices. Pine is the most affordable, while cedar and cypress offer better natural resistance to moisture and insects.
How much weight can a porch swing bed hold?
When properly built and attached to structural framing, most porch swing beds can support between 500 and 800 pounds. Always verify that your porch structure can safely handle the load.
Should I use rope or chain to hang a porch swing bed?
Both can work well. Rope provides a softer, more traditional look, while chain typically requires less maintenance and offers greater long-term durability.
How far should a porch swing bed be from the wall?
Leave at least 18 to 24 inches of clearance between the swing bed and surrounding walls, columns, or railings to allow for comfortable movement.
Common Mistakes to Avoid When Building a Porch Swing Bed
After building several porch swing beds over the years, I’ve learned there are a few mistakes that can make the project more difficult than it needs to be.
1. Building the Swing Too Large
A larger swing bed isn’t always better. Make sure your porch has enough depth and width to accommodate the swing and allow for movement.
2. Skipping Structural Support Checks
The swing bed is only as strong as the structure supporting it. Always attach hardware directly to structural framing members.
3. Using Interior Hardware Outdoors
Exterior-rated fasteners and hardware are essential for long-term durability.
4. Forgetting Mattress Dimensions
Purchase your mattress before building so you can verify the exact dimensions.
5. Not Sealing the Wood
Even on a covered porch, moisture and humidity can damage unprotected wood over time.


229 Comments
Great job Henry! I love the way you explain,very easy to follow along. It turned out beautifully. Our porch for our new home is small and our deck is not cover. Do you think we can just add legs and use as a kind of floor sofa/swing for the deck? Thank you so much for sharing.
October 1, 2018 at 12:09 pmHi – this is beautiful! I’m also curious about adding legs to make it a sofa instead of a swing? Have you done this or any recommendations? I’m halfway through building the sofa (modified to a 32 x 64 inch version) based on your instructions (was going to figure out legs/bottoms once I saw it – sigh. I know not the best planning). It’s *very* heavy. Do you think just using some 4x4x8’s cut down to leg height and screwing them in would work? Should I add another support or any other suggestions?
March 11, 2019 at 4:37 pmThese directions were awesome! It only took 2 days and I am so proud of what I made
April 2, 2020 at 10:56 pmWhat size/type bedding/mattress did you use?
April 15, 2020 at 4:08 pmSharon, it fits a twin perfectly. 🙂
June 8, 2020 at 2:55 pmDo you think legs are an option? I’ve built this piece and it’s beautiful but unfortunately I don’t think my porch shiplac ceilings will accommodate!
August 3, 2020 at 12:42 pmThere are joist the shiplap are attached to. Those are what will support it
April 22, 2022 at 7:05 pmWhat colour stain did you use!? Great plans I’ll definitely be giving you a shout out on Instagram 😊
January 8, 2021 at 3:09 pmGreat directions! I want to make one like this for a Queen size Mattress.
July 18, 2020 at 1:59 amCould I use a jig saw for all cuts instead of both miter and jig saws?
April 19, 2020 at 2:40 amHenry What size eye screws did you use?
April 23, 2020 at 1:25 amDo you have an idea of the weight limit?
March 14, 2021 at 1:53 amThanks! Glad you like it. Yes, you could definitely do that, but I would recommend using a wood that is more weather resistant, like cedar, cypress, or treated wood.
October 1, 2018 at 12:20 pmBeautiful. I have a rooftop deck so no roof over it to attach to. Do you think if I build a stand it could support a swing bed like this?
June 22, 2019 at 7:12 pmMade one for me wife for Mother’s Day! All four kiddos played a role. Would love to send you a pic. Great plans! Used pine and just used outdoor spar poly over the natural wood. Love the way pine turns to gold.
May 25, 2020 at 12:16 amWhat size eye bolts did you use? And also what rope?
June 30, 2020 at 10:51 pmSo the eye screws I used bent. They were rated 250lb each, and we’re not that heavy!! Any input on the eye screws would be great!!
July 24, 2020 at 2:32 amEye screws are not meant to have the load pulling at an angle. So if you’re going that route you need to beef them way up. Also you should never account for just the weight of the people planning to sit. Account for worst case.. 4 people and someone else jumping on top while it’s slightly swinging
March 5, 2022 at 4:09 amKid you happen to remember what size depth of twin mattress you used?
November 1, 2020 at 11:45 pmWhat color stain did you use!? Inhave a hard time picking something that does not pull red or orange?
October 12, 2022 at 11:46 pmLove this! What color stain did you use?
October 3, 2018 at 5:52 pmThanks! Whoops. I guess I should have mentioned that in the article. I used Minwax Polyshades Mission Oak.
October 3, 2018 at 6:57 pmWe built one too and can’t wait to get it hung at our lakehouse here in TX. Curious though, how many coats of stain did you cover it with for protection? Also, I want to thank you for taking the time to post the plans of this beautiful swing.
June 6, 2019 at 3:35 amAwesome, and you’re very welcome! I put one coat of stain on it, and then a couple of coats of polyurethane.
June 6, 2019 at 1:52 pmhi Hemrey, just finish to build it, thank you, can you tell what kind of polyurethane you used ?
thanks,shahar
May 22, 2020 at 1:31 pmHi! I know this post is over a year old, but hopefully you’ll still see my question. The Minwax Polyshade in mission oak looks so much darker than the color of your swing. Did you dilute the color before applying?
August 28, 2019 at 8:55 pmThank you, in advance!
My husband made this swing for me in a short afternoon! I covered the mattress and made the pillows and that took much longer. But it’s really quite spectacular and turned out dull backporch into an inviting area! Now if the weather cooperate so that we could actually sit out there at night! Thanks for the plans and inspiration!
September 16, 2019 at 3:50 pmJana, did you use sunbrella fabric to cover the mattress and pillows?
July 27, 2020 at 8:02 pmAre the 1 x 3’s finished at 2 1/2” wide. Love the plan. Planning to make the arms a little wider.
May 17, 2020 at 1:22 amNice work – Thanks for sharing! How did you do the inner support with the 2×4 to get the over lap bulk look – like in the picture of you with the drill.
October 4, 2018 at 4:32 pmHi there Rhonda. Thanks and you’re welcome. 🙂 I think you might be referring to the 1×3 trim pieces that are nailed to the outside of the frame. Check out the step right after the picture of me with the jigsaw.
October 4, 2018 at 5:01 pmHi! We just built one and ordered the burlap world market cover. Trying to find a mattress that will fill the 13in thick cover, but they are all about 8in thick. I noticed you said yours was about 8in thick – was there any sag since the cover is about 5in thicker? Should I order two mattresses or do you think one 6in mattress is fine for the cover? Thank you!
April 26, 2020 at 6:18 pmHow can you only use 3-1x8x8 when you have to get 2–77” and 2-39”
July 19, 2020 at 4:56 pmYou can get the 2 39″ pieces out of one 1×8″x8′. There are 96″ in a 1x8x8′. 96″ divided by 2 is 48″.
July 22, 2020 at 1:35 amWhat material did you use to cover the mattress and pillows? Do you have mold and mildew?
July 27, 2020 at 8:08 pmLove the design. Where did you get the cushion for the swing?
October 8, 2018 at 10:27 pmHi Tammy. Awesome! Glad you like it. It’s a standard twin bed mattress. I think we got this one at BigLots.
October 9, 2018 at 1:24 amHow far away from the wall do you recommend installing this?
May 17, 2020 at 12:40 pmI’m having a tough time finding the best way to cut all the 1x3x8 to only need 11 pieces of this dimension? I’ve mapped it out a few times but it doesn’t seem like only 11 will be enough unless I’m missing something or not using the right cut for each step? Thanks for the help
June 25, 2020 at 6:35 pmI just followed these plans and wound up 4 boards short. I definitely think some boards are missing in the materials list.
July 12, 2020 at 11:04 pmYes, I just finished the 1×8 box and have moved on to the 2×4 support for the slats. The plan called for 1-2×4, but I need 3 bc I need 2-72 1/2” and 2-39“. I’m having fun tho… I have to go back to the store anyway. Is there any other boards I should grab while I’m there that we’re left off the list?
September 24, 2020 at 7:32 pmThe mattress cover dimensions you ordered are not comparable to a twin size mattress that I can see. Can you provide the mattress dimensions you have? Thanks.
August 26, 2020 at 2:38 pmWhere did you get the twin cushion?
October 13, 2018 at 2:47 pmIt’s a standard twin bed mattress. I think we got this one at BigLots. We didn’t want to spend much on it since it’s outside.
October 14, 2018 at 2:23 amHi, how do you hang the swing bed to the ceiling ?
October 20, 2018 at 4:09 amHi Brenda. I screwed eye screws into the ceiling joists in the porch ceiling. Then ran a rope through them and through each eye screw on the bottom of the swing, and tied knots as you can see in the pictures.
October 22, 2018 at 12:14 pmDo you guys actually use it for sitting? We have a traditional porch swing and use it all the time. I love the look of these but wonder how they are for functionality.
November 25, 2018 at 11:45 pmHello Mike! Yes, we actually use the swing bed lots! We use it for sitting and taking naps on…lol. The location of our swing doesn’t allow it to swing very high, but that’s not really what we wanted it for. If you were to hang in a location that had a little more room, Im sure it would be just fine. Henry made one for my mother and she the placement of it is perfect for swinging and the grandkids use it tons for that!
November 27, 2018 at 4:04 pmI was wondering what you used for the cushion and where to find materials. Thanks.
December 29, 2018 at 7:13 pmHi Lisa. We used a standard twin bed mattress, and the cover is from World Market. You can find the link in the link in the second to last paragraph.
December 31, 2018 at 2:42 pmAwesome project! Is the mattress cover waterproof? Mine will be out in the elements.
August 30, 2019 at 9:19 pmWe were wondering why you put the top cap on the back? Does it get in the way when you sit back on the swing?
June 14, 2020 at 3:43 pmWhat kind of windows are those? I love the black 🖤Can’t decide on a brand/series.
December 30, 2018 at 2:42 amHi Rachel. They are PlyGem double hung.
December 31, 2018 at 2:43 pmHow much weight does it hold? Will it hold two adults at the same time?
February 3, 2020 at 4:41 amThis is on my New Year’s To Do list!! Thanks for the plans they seem very straightforward and easy to follow!
January 4, 2019 at 7:48 pmYou’re very welcome!
January 23, 2019 at 6:35 pmWhat diameter rope did you use?
January 20, 2019 at 2:27 pmThis rope is 1/2″. I wanted 3/4″, but they were all out at Home Depot.
January 23, 2019 at 6:36 pmHello, this plan looks awesome! Did you do any pilot holes before nailing?
January 23, 2019 at 1:29 pmThanks! I used pilot holes for the screw eyes that the rope runs through.
January 23, 2019 at 6:38 pmThank you! Do you think it would be possible to use screws everywhere instead of nails? I already have a drill, but I do not have a finish nailer.
February 1, 2019 at 3:58 pmYes, you could do that. But for that you would need to frill pilot holes.
February 5, 2019 at 3:04 pmCan you share a link for that ceiling fan?
January 31, 2019 at 2:01 pmHere’s the link: https://www.houzz.com/product/50272172-52-discus-ceiling-fan-black-transitional-ceiling-fans
February 11, 2019 at 1:57 pmHenry, Do you have a rough estimate for the final costs including the mattress? Thanks. Great job! Thinking of trying to surprise the wife with it. Hopefully comes out as good as you did.
February 7, 2019 at 3:58 amHey Patrick. I didn’t keep track of the exact price of everything, but I would say it was no more than $300 including the mattress, but you could probably find a cheaper mattress option to keep the expense down.
Good luck! I’m sure your wife will love it!!
February 11, 2019 at 1:48 pmAny idea about a weight limit?
February 11, 2019 at 9:36 pmWe really aren’t sure, but at times have had at least 350-400 pounds on it at one time.
February 12, 2019 at 8:08 pmI’m dying to make a porch swing bed for our new house in Waco, TX. I’m hoping to make a full size bed so that my 6’5″ husband can fit on it with me and the baby. Do you have the measurements for a full instead of a twin? Your swing is BEAUTIFUL btw! I’m curious, how has a regular mattress stood up to weather? Does it ever get wet? Thanks!
February 15, 2019 at 8:55 pmThanks and sorry for not replying sooner. Just now saw your comment. A full mattress is 54” X 75” vs a twin which is 38 x 75. So you would just need add the additional width onto the pieces of wood on the side frame and rails. Our mattress has done very well, although it is completely shielded from the weather. The only time it gets wet is when wet kids coming out of the pool hop on it. Good luck with yours!
March 3, 2019 at 10:57 pmI believe you may be short 3 maybe 4 1x3x8’s on your material list.
February 19, 2019 at 5:27 pmThanks for catching that. I’ve updated the material list.
February 21, 2019 at 10:56 pmThe swing is beautiful… can you please tell me what is the space between two eye screws in ceiling…? It seems close, I have two joist running 24 inches apart.. Would that work..? And also how far is this two screws from the other two..? Should it be longer/ same / or shorther than the length of swing? Thanks for the nice easy plan
February 23, 2019 at 12:56 pmThank you! I had to place them like that to keep the rope away from the fans. It was poor planning on my part. We should have went with three fans. 24 inches would definitely work, or if you could go wider, that would be good to. And the two sets of screws should be the length of the swing apart from each other, or close to it. Hope that helps!
March 3, 2019 at 10:46 pmWe’re wanting to do this under our pergola that would be open to the elements. I’ve hestitated because of the mattress. How would you suggest doing this if the swing were not covered?
March 1, 2019 at 8:15 pmIf its going to be out in the weather, I would use a different wood, maybe a cedar or some type of treated wood. As for the mattress, maybe do a google search for some kind of outdoor cushion. Sorry I can’t be of more help.
March 3, 2019 at 10:59 pmMany people have used air mattresses for the outdoors. You can also use a foam mattress with waterproof mattress covers then add your fabric cover – even double up on the waterproof covers.
June 20, 2019 at 10:00 pmHi Henry
Love the swing. I plan to build this swing this week and wondering about how long it took you to frame this all out before staining.
December 28, 2019 at 5:45 amMy son and I built this swing and it took less then 3 hours and I have very little wood working experience. GREAT job on the instructions. I did end up changing the 1×3’s out using 1×4’s for the arms. I also used a jog saw and rounded the front of the arms. Turned out really nice
December 30, 2019 at 10:50 pmWhat size eye screws did you use?
October 13, 2019 at 5:49 pmLove this guys. My husband is making it for mother’s day. WhAt stain exactly did u use.
March 2, 2019 at 6:14 pmThanks so much
Thanks! That is awesome. I’m sure you all will enjoy it. It is Minwax Mission Oak.
March 3, 2019 at 10:47 pmWhere did you get your wood fromm
March 3, 2019 at 7:44 pmI got the wood from Home Depot.
March 3, 2019 at 10:47 pmDo you have a suggestion on what screws to use if utilizing a drill over a nailer? Would deck screws be ok?
March 5, 2019 at 5:03 pmYes. Deck screws should work just fine. Just make sure they are not too long. Probably 1 1/4″ would work best. Also make sure to drill pilot holes. The downside to using screws is that it will take longer to build and the screw heads will be showing in a lot of places.
March 6, 2019 at 2:42 pmHey Henry, I was planning on using a crib mattress. I know a lot of measurements will change. But most changes would be with steps 1 thru 3 correct? The others I would have to do accordingly. Do you have plans for a crib mattress by any means, or is that something you can adjust simply on your end? The dimensions of that mattress are 28″ w x 52″ L.
March 6, 2019 at 1:10 amHi Patrick. That’s correct. The main measurements to change would be 1-3, and then all other measurements on the x and y axis. I’m afraid I don’t have all of those adjusted measurements, but all you would need to do is calculate the width and length different between a twin mattress and crib mattress. Then subtract those values from the current measurements.
March 6, 2019 at 2:39 pmDo you have a supply list for a swing that would fit a crib mattress by chance? My mom and I are building and need it as idiot proof as possible haha. If not I understand but wanted to ask!!
March 12, 2019 at 9:54 pmHi April. It should be a fun project for you and your mom! I’m afraid I don’t already have plans for a crib mattress version, but it should be pretty simple to make the adjustments. You’ll just need to determine the difference between a standard twin mattress and the size of the crib mattress you’re using. Then subtract that from the measurements in this plan. Hope that helps.
March 18, 2019 at 7:26 pmthank you for the easy plans !! My 1st project and though it took me much longer to make. It looks great !!
March 16, 2019 at 8:15 pmHi Donna. That is so awesome! I’m happy I could help.
March 18, 2019 at 7:27 pmHello! How high off of the floor is the bottom of the frame? Thank you!
March 24, 2019 at 5:47 pmHi Justin. Ours is about 1.5 feet off the floor. But something to keep in mind is that the rope with stretch some over time. So you may want to hang it a bit higher than where you want it to be.
March 25, 2019 at 12:33 pmWhat’s the stain of your porch! LOVE it!
April 7, 2019 at 2:59 pmHello Elise! So happy you like the look of the porch. The stain is Cabot Gold that we purchased from Lowes. I do love the look and it is so easy to clean. The biggest negative I have with it is it can get very slippery while wet.
April 8, 2019 at 12:35 pmI would think that burlap would be a rough surface. Just exactly what kinds of material did you use for your pillows and other accessories. Sunbrealla is so expensive.
July 27, 2020 at 8:21 pmWhat is the thickness of the mattress. Looked at burlap cover and some reviews said it did not fit the thickness of their mattress well.
April 14, 2019 at 7:55 pmOur mattress is about 9″ thick and our cover fits very well. Hope that helps.
April 19, 2019 at 1:06 pmLOVE THIS, I am going to attempt this at my new house – first project! Can I ask how much this cost for material, not including the power tools?
April 19, 2019 at 2:37 amAwesome! I’m sure it will turn out great! The cost was around $200 – much cheaper than buying one. 🙂
April 19, 2019 at 1:07 pmGreat tutorial – can’t wait to build mine? What length of rope did you end up using to hang the swing?
April 19, 2019 at 4:17 amI’m sure yours will turn out great! Our ceilings are 10′. So I got 27′ rope to make sure I had enough, but also take into consideration how far apart your ceiling eye screws end up being.
April 19, 2019 at 1:10 pmDo you know the approximate weight? I want to make this and wonder if I could hang it off of 1 joist?
April 29, 2019 at 1:33 pmHey Lilli! Im not sure what the exact weight is on the swing, but I would recommend hanging on at least two joists. I feel like it is a little too heavy for just one.
April 29, 2019 at 5:17 pmHi, the porch swing looks great, and I’m attempting to build it too. For the finish nails, is it important to use 16ga, or would 18ga Brad nails be strong enough for the twin bed load too? Thanks!
May 1, 2019 at 6:58 pmI would recommend using the 16ga if you can.
June 6, 2019 at 1:50 pmThis looks great and I plan on building it this week. Did you put a cover on your mattress? If so can you share what it is?
May 2, 2019 at 5:53 pmnever mind, I read the post and found the info… just being a true guy that can’t find stuff right in front of him :). Thanks again for sharing.
May 3, 2019 at 3:34 amHi Patrick. Sorry for the slow response. Glad you found your answer.
May 3, 2019 at 1:36 pmSo, do you guys have any plans for a frame that, when I make this swing, I could hang it from that instead? I don’t have a front or back porch, so I need a place to hang it from.
May 4, 2019 at 8:47 pmHi Erika. I’m afraid we’ve not created a plan for a frame for the swing. Sorry about that.
May 6, 2019 at 1:36 amHello! Building this for my first wood project ever! What length eye screws did you use for this?
June 6, 2019 at 12:25 amThey are 2″. Good luck building your swing!
June 6, 2019 at 1:43 pmThis is so great! Thank you for the fantastic instructions. I’d like to make this but with wider armrests, so you could set a book or drink on them. Do you think that would interfere with the rope/swing action too much?
June 7, 2019 at 12:42 pmYou’re welcome. I don’t think the wider arms would interfere with the rope as the extra width would be toward the inside of the swing instead of the outside. But do be aware of the movement of the swing. Might be hard to keep drinks for falling off. 🙂
June 25, 2019 at 1:29 pmI’m assuming the finish nails and glue are strong enough for all the weight based on your plans and level of experience (my experience is very limited!). I just wonder if pocket holes might be good for at least the base? Do you have any thoughts on this? Thanks so much!!
June 8, 2019 at 4:54 pmYou’re welcome. Yes, they are strong enough. Keep in mind that the corners have 3 layers of wood that are overlapping, glued and nailed through each other. The first swing I made using this same technique is about 7 years old and is still going strong. You could use pocket screws on the corners of the 2x’s, or you could also use 90 degree metal brackets. You can find these at Lowe’s.
June 25, 2019 at 1:37 pmWhat gauge nails did you use? Thanks!
June 23, 2019 at 3:42 pmThey are 16ga.
June 25, 2019 at 1:38 pmI just built this and love it! But my husband is going on and on about finish nails and glue not being enough to support any significant weight once hung. Has it held up pretty well for you? Is there anything additional I could do to reinforce it?
June 24, 2019 at 1:38 amAwesome! Congratulations. I understand his concern, but keep in mind that the corners have 3 layers of wood that are overlapping, glued and nailed through each other. The first swing I made using this same technique is about 7 years old and is still going strong. For added support, you could use 90 degree metal brackets in the inside corners of the 2x’s. You can find them at Lowe’s.
June 25, 2019 at 1:40 pmSo, I’m almost done building this. Very quick thanks to your awesome tutorial. Now that I’m almost done, I’m wondering if I put the cart before the horse. We have a patio cover with beams that are roughly 5.5″ high and 3.5″ wide. Will that be enough support. We don’t have any roof overhead, so it’s all patio cover. Thanks!
June 28, 2019 at 1:18 amGreat stuff Henry and super helpful. Going to build this for outdoor use hanging from two 6×6 posts plus beam in our yard. Thoughts on other wood options than pine? Can use PT pine for that 2 by innner piece.
June 28, 2019 at 1:30 amBut thinking of something naturally weather resistant since it’ll be out in the elements here on the east coast. Cedar 1 by (unless perhaps it’s a true 1 by – 5/4) seems like it wouldn’t be strong enough?
Hello. I was wondering how you make sure the bed is balanced and doesn’t tilt forward or back once it’s hanging. Great plans and thank you.
July 16, 2019 at 1:05 pmGreat work! Thanks for sharing! We made something similar with a crib mattress. It’s location we’re hanging won’t allow it to swing so it’ll be used to sitting. Is 3/8” rope to thin would you say? I can’t find 3/4 or 1/2 anywhere near me!
July 25, 2019 at 6:50 pmHello, We love this plan. Do you know of anyone who has hung this from a screened in porch that has a deck above? Our deck sits on top of our screened in porch so there are not “ceiling joists” per say rather the 1 x ?? that support the floor deck boards.
July 28, 2019 at 2:16 amHello Heather! Sorry for the delay on getting back to you. I would really prefer having those ceiling joists for as much weight as it is.
September 25, 2019 at 4:01 pmOn the swing did you use eye bolt or eye screw. What size were they.
August 7, 2019 at 4:39 pmHey Randy! Henry used eye screws… hope this helps!
September 25, 2019 at 3:58 pmHi there I love this! I’m sending to my husband to build. What would you say the weight limit is?
July 5, 2020 at 3:59 pmLove this swing! Wondering if you have any suggestions for hanging when you have vinyl soffit? 😬
August 18, 2019 at 3:28 pmHey there Jen! The biggest thing is to just use the stud finder to find the ceiling joists.
September 25, 2019 at 4:00 pmThis was such a well explained guide to building this swing!! My husband just made it for our new house and it went so smoothly and there were no questions! It was like a recipe for built! Thank you for taking the time to share your knowledge!
August 30, 2019 at 3:30 pmAwesome! So glad you found it helpful.
September 13, 2019 at 1:10 pmBeing you’re using a regular indoor bed matress, have you noticed any mildew? Curious how a matress will hold up with humidity, etc.
September 12, 2019 at 4:03 amHi Michelle. We’ve not noticed any mildew issues with our mattress.
September 13, 2019 at 1:11 pmHi! I’m interested in trying to convince my husband to help me make this swing, lol! I’d like to paint it. Wondering if you’d recommend painting it before or after it is built? Thanks!
September 21, 2019 at 8:45 pmHello Christine! I would say either one you prefer, but keep in mind if you paint it before you will just need to do some touching up after. Im sure this is going to look great!
September 25, 2019 at 3:58 pmHi!! Do you know what the weight limit on this bed is? Thanks so much!!
October 15, 2019 at 3:33 pmHi Breanna. We’ve had up to 450 lbs on it at one time with no issues.
October 16, 2019 at 2:13 amHow long did it take to build and install?
October 21, 2019 at 7:54 pmHello Patti! Henry said it took him around six hours with building, staining, and hanging.
November 1, 2019 at 2:22 amWhere did you find the “unfinished” style rope you used? What diameter, i.e. 3/4″? Thanks, Patrick
October 31, 2019 at 7:07 pmHello Patrick! Henry purchased it at our local Home Depot. Our rope is 3/4, but get 1 inch if you can find it.
November 1, 2019 at 2:23 amHi there. Finished and love my new swing but ran into a problem that no one else seems to have mentioned. We used 2 eye hooks, just as you did and when you sit on the bed – unless you are sitting directly in the center – the rope shifts through the eye hooks and the bed tilts forward drastically. Didn’t you find that to be the case? It wouldn’t happen if there were only one eye hook but because there are 2 it’s natural for the rope to move when you sit on the front of the bed. How can we rectify this? Any ideas?
March 1, 2020 at 1:42 amThat’s great! So glad you’re loving it.
This can be a problem on a newly installed swing. Once the swing has some weight on it for a while in the proper position, the rope will form indentions where they overlap the hooks. Which will keep the rope from sliding. Another option is to use some type of clamp on the ropes where they go through the hooks, like this: https://www.homedepot.com/p/Everbilt-1-8-in-Zinc-Plated-Wire-Rope-Clip-2-Pack-42594/205883055
March 3, 2020 at 4:25 pmBuild the swing and love it. However, the rope is slipping through the eye hooks on each side (at the ceiling) and the swing tilts and seems unstable. We were able to locate the 1 inch rope at Home Depot.
June 3, 2020 at 1:04 amWhat is the overall dimensions?
March 10, 2020 at 4:33 pmThank you for instructions!
I bought the world market burlap cover and the dimensions said 74x39x13 on their website and my twin beds got from amazon are 74x38x6 (still waiting for them). I got two twins to stack them to fill in the burlap cover so there would be less wrinkles. Most twins are 75×39. Do i need to adjust the frame size from 77” to 76” (including the other front and back measurements) or can i use the measurements in the instructions as is? I don’t think a inch would be a noticeable gap but i would like the bed to fill the porch swing in, similar to the photo. What do you suggest?
March 23, 2020 at 1:24 pmHi, how much did you pay for all the supplies need for this project?
March 23, 2020 at 2:54 pmI really love this pattern. I shrunk it down for a 24 x 62 dense foam cushion. Basically a 5-foot swing. Big enough to lay down for one person. However, I suggest either lower the arm when you’re not going to use a twin mattress or raise the bottom up higher. I inadvertently did not take this into account. The arms feel way too high with a 6-inch foam cushion.
March 26, 2020 at 6:54 pmI love this simple design; however i’m being dense about how a twin (38″ x 75″), is fitting into a 38″ x 72 1/2″ frame?
Thank you for your time…
March 29, 2020 at 9:46 pmThe 72 1/2 is the measurement of wood inside the outer frame, the slats rest on that wood and the mattress sits on top. A twin fits, I made this a few weeks ago. I was short quite a few 3×8’s, maybe six of them. We used 5×8’s for the armrests so we can rest drinks and things on them. Turned out pretty great.
March 31, 2020 at 2:04 amWould you let me know about how much it cost for all the materials. Trying to get an idea of how much we should expect to spend!!
April 4, 2020 at 8:16 pmWe built it for around $200.
April 7, 2020 at 6:42 pmHi! I’d like to hang this swing in an area that is partially uncovered. I’m wondering if you know of a really waterproof mattress cover that might work?
April 5, 2020 at 11:05 pmI’m afraid I don’t know of any. You might also want to consider using a wood that can withstand water better than pine.
April 7, 2020 at 6:43 pmNot a big deal, but your drawing shows 5 slats, but the plans call for 6.
April 7, 2020 at 6:38 pmLoved making mine. My modifications were to use some moulding along the bottom, instead of 1×3’s. I also eased the front edge of the side rails as well the outside edges of the top peice at the back. Thanks.
Love this project! The pictures of this swing make it look like maybe a foot or so away from the house. That’s all the room I’d have because my porch isn’t deep. Have you been worried about it swinging too much? Thank you 🙂
April 9, 2020 at 5:47 pmWe were just looking over the directions to begin building. The directions call for 6 slats, but the drawing only shows 5. Which did you end up using? 5 or 6? Thank you for your time!
April 10, 2020 at 10:54 pmWhere did you buy the cushions that fit?
April 11, 2020 at 3:48 amAny more information on the eye hook? Last bit of our project and need to make sure length, width, and eye diameter work with the swing. Your links for other pieces helped greatly!
April 14, 2020 at 10:18 pmWas curious if it was possible to make this with common board instead of pine?
April 15, 2020 at 4:31 amor possibly whitewood board?
April 15, 2020 at 4:44 amThat’s what we used! Stained it and it looks fabulous!
April 29, 2020 at 1:11 pmWhat size/type bedding/mattress did you use?
April 15, 2020 at 4:14 pmI love this idea. Can I put legs on it?
April 20, 2020 at 3:20 amAmazing! Do you a work around to hang inside a Pergola?
April 22, 2020 at 9:25 pmI just finished building this for my wife for our anniversary. The plans were super easy to follow. I didn’t have a brad nailer, so I just used screws. I think that made it stronger, too. I also used 2×4 on the bottom with a hole for the ropes to hang from instead of the eye screw. Some trouble I ran into was hanging it. Because of the weight that would possibly be hanging from the ceiling I had to do some reinforcing. I would definitely do some research on proper hanging of porch swings. Luckily my friend’s father is a structural engineer and gave me some tips on how to disperse the weight. Thanks for the plans!
April 27, 2020 at 2:55 pmCan you please tell me where to buy the cushion for this?
April 28, 2020 at 4:43 pmThank you so much for easy, precise directions!! I was able to make this without my husband and I am beyond proud of it!! I love it!!
April 29, 2020 at 1:09 pmDo you know the dimensions for this swing with a crib sized mattress?
May 2, 2020 at 10:10 pm53 X 261/2 leaves you a little room to work.
May 8, 2020 at 11:58 pmThanks for the interesting project. I found that I needed 3 more 1×3 for the bottom trim band.
May 3, 2020 at 1:33 amAny more project on your site.
Thanks
John
The back of the swing looks like the top piece of wood could be uncomfortable on your back because it sticks out a little. Have you thought about making the back flat/smooth? Does this question make sense?
May 3, 2020 at 7:29 pmAre you able to provide a cutting diagram for the 8 pieces of 1”x3”x8’
May 4, 2020 at 8:01 amI seem to be needing 9 pieces when I add what’s required
Thanks!
How much weight can the swing hold? And, did you use reinforcements on the ceiling? TY 🙂
May 4, 2020 at 3:47 pmNice easy plans. I altered them a bit for a crib size mattress which my daughter requested. Then I also engineered it so in about 2 minutes I could convert it into a traditional porch swing. Turned out very nice.
May 8, 2020 at 11:56 pmThat’s great Richard! Happy it turned out well.
May 12, 2020 at 1:37 pmWhat wood did you use for the back and side rails?? I don’t think it specifies it in the plans unless I looked over it!! Haha!! I think it looks like 1×3 but I thought I’d make sure!!
May 9, 2020 at 10:29 pmI used 1x3s for all of the rails.
May 12, 2020 at 1:40 pmI added metal corner braces under the bed on the 2×4’s. Oh I used all 2×4 framing instead of 2×3 and 2×4 just seemed easier. Im not sure the braces are needed but I am an engineer and overthink everything. I also needed 9 of the 1x3x8. This is a great plan. I have built two now and can build one in about 3 hours. Thank you so much for the great plan and directions.
May 12, 2020 at 12:54 pmYou’re very welcome! Sounds like you have it down to a science. That’s funny, because I also added the metal braces to the one I built, but didn’t include them in the plan because I didn’t think they were necessary. 🙂
May 12, 2020 at 1:39 pmI used Polyshade Mission Oak on mine but it’s much darker than this one 🙁
May 17, 2020 at 6:43 pmHi! I’m new to woodworking and don’t really understand eye screws as of yet. As such, would love if you could share the exact dimensions of the eye screw to ensure that everything works right. I saw that you mentioned 2″ in the comments, but there’s a lot of variety out there. Greatly appreciate it.
May 18, 2020 at 5:19 ami just finished to build it and its look fantastic,
i am not sure about the stain (not familiar with that)
PolyShades Satin Mission Oak Oil-Based ?
and the polyurethane: Minwax One Coat Polyurethane Satin Water-Based Polyurethane ?
thanks, Shahar
May 25, 2020 at 7:52 amHenry great job love it! Did you post the sketchup drawing and/or can you?
May 28, 2020 at 7:06 pmThanks
David
Hi – So I am so excited to make this – We already have a custom porch swing on our screened in porch. I am going to put the twin swing (not crib size) in our family room. I’ve got a nice open space for it – I am so excited! Question: I noticed on the link to how to hang the porch swing – you only use single eye hooks in the ceiling joists (for the crib size swing). But in the picture of the twin size swing – you use two eye hooks on each size (four total). With the bigger swing, I think the double eye hooks would distribute the weight better. What measurement do you recommend on the two hooks on each side? 6 inches? Thank you!!
June 5, 2020 at 10:54 pmLove your work!! We are going to build it tomorrow, and have already bought all our wood needed. But now we are thinking that we should build one to fit a twin XL mattress instead, which is 38”x80” or 5” longer. Other than making those adjustments with the length beams and potentially adding another mattress support plank, do you think that we will need to buy more wood? Thank you for the inspiration!!
June 7, 2020 at 2:14 amHello, I am thinking about building this outside. Can I stain the wood to protect it or do I need to use pressure treated wood? Pressure treated does not come in some of these dimensions
June 7, 2020 at 2:44 pmWhat were the metal corner brackets that were used? Where and how many? Thanks!
June 7, 2020 at 5:06 pmHey Henry. What size rope do you recommend 3/4 or 1 inch. ?
June 14, 2020 at 8:44 pmLove the plans! Thanks for sharing. Here is our swing bed.
June 25, 2020 at 7:38 pmI am excited to get started making this. What size cushion is it and where would you get one? Can you paint it? I want to make it shabby chic..Thank You
June 28, 2020 at 1:48 amThanks for the great instructions I love this project. Thanks so much for sharing.
July 7, 2020 at 7:34 pmYou’re very welcome.
July 12, 2020 at 9:53 pmWhere are the instructions for the one that has the x on the side?
July 11, 2020 at 7:12 pmI love this one also. Trying to make it look shabby chic.
Looks like exactly the same but the side…So excited to get started…
Thank You for all your beautiful ideas..
Here it is: https://plankandpillow.com/how-to-build-a-crib-mattress-porch-swing/
July 12, 2020 at 9:52 pmI did the thing! Hung it under the Mulberry tree! Thank you so much for the inspiration and the so easy to follow plans! I built that!
July 16, 2020 at 8:09 pmI built it, and it’s gorgeous!
July 18, 2020 at 8:12 pmThank you for your tutorial! I wish I could attach a picture. 😊
Am I missing something, I can’t find the Dimensions for the 4 posts? I’m sorry if they are there….
July 20, 2020 at 8:37 pmHi Allan. The dimensions are in the first image under Step 2.
July 22, 2020 at 1:27 amSo I loved the directions but wanted to point out a couple things. I followed the steps and cut my wood at each step. I knew I wanted to do extra slats so I bought an extra board for that. I still did not have enough to do the boarder. I ended up needing 11 of the 1x8x8 to complete the project and 4 of the knotty pine in the same dimensions. I also wanted to reinforce it, so I ran a 6ft 2×4 board down the middle to nail the slats into as well and secured this with 3in screws. I also added screws in the bottom corners, which got covered up by the trim pieces that got installed around the bottom edge. Just wanted to point these modifications out because my wife and I can now both sit on the swing without it creaking at all.
July 30, 2020 at 3:23 amDo you have to use a finish nailer or can you use screws?
July 30, 2020 at 9:28 pmYes, you can use screws, but you will have to deal with the screw heads showing.
August 25, 2020 at 8:06 pmHi Henry
August 25, 2020 at 8:00 pmCould you please tell me how far from the wall behind did you install the hangers in the ceiling?
Love the swing I’m planning to build one
Thanks !
Hi Ben. This swing is about 14″ away from the wall. I wouldn’t recommend going much less than this.
August 25, 2020 at 8:07 pmI love this plan, but am I crazy or is the wood count wrong for the 1x3s? I am just getting to the lattice work around step 6, but I’m about (7) 1x3s short. Am I missing something? Thanks!
September 12, 2020 at 2:03 pmI noticed that you’re only using the nail gun to assemble this swing. My question is how sturdy is the swing with only using the nails? Thanks!
September 24, 2020 at 8:19 pmLove the plans thank you for sharing. Why did you use a 2×4 and 2×3 instead of 2×4 everywhere?
December 28, 2020 at 5:46 pmI wondered the same thing! Nonetheless I followed his instructions.
October 2, 2022 at 8:53 pmJust stumbled upon your page through pinterest & so glad I did! Curious if you have total cost estimates listed for your projects?
January 19, 2021 at 4:01 pmMy 13 year old would like to make one of these for his actual bedroom and new bed to sleep on. Do you think this would be idea? Also – what is the approx. cost?
March 14, 2021 at 8:13 pmI have been waiting years to build this for my wife to hang in our covered gazebo and finally pulled the trigger. I am so glad I did. I would suggest to anyone on the fence about buying the plans, just do it, they are well worth it. I basically finished the whole thing yesterday afternoon/night. The butt-joint design makes this a snap so as just basic carpentry skills are required.
To the designer I would only offer one bit of commentary, not even a criticism. I’m kind of a bigger guy and your design has the 1X3 mattress supports spanning the entire width from side to side without any supporting board holding up the middle. What I did was take my 2X3’s and spaced them about 11′ apart then ran them horizontally from end to end to support the mattress slats. Maybe overkill but if your design had at least one two-by running down the center for the 1×3’s to rest on, it would offer a lot more stability and support even if not all that necessary.
Great website and thanks again for the design!! We can’t wait to chill on this swing.
March 29, 2021 at 12:34 pmDoes the untreated pine hold up well with just a coat of stain? I was wondering if treated wood might be better.
April 20, 2021 at 11:07 amMyself and a friend built this yesterday in about 6 hours. Excellent easy to follow plans. The amount of wood was just right. I love the finished product!!
April 26, 2021 at 4:27 pmHenry, thank you so much for this plan and for answering so many questions here too. Now off to buy a twin mattress
Hi! I wanted to find out if 18 gauge nail finisher would work instead of the 16 gauge?
May 17, 2021 at 12:35 pmGreat swing – built it in a day and we love it! Only suggestion would be to double up the number of support slats for the mattress. We’ve already broken two!
June 10, 2021 at 11:04 pmAny particular reason that you chose nails over screws?
July 5, 2021 at 12:15 pmNails and wood glue are easier to work with and wood glue and nails are stronger than screws.
July 19, 2021 at 3:26 pmThank you for this guide. I love the instructional video! I build my DIY porch swing bed and these help me a lot. The instruction was understandable, I followed the step-by-step instructions. I bought a tree swing at treeswingstore.com for our backyard and the kids love it as much as I do!
October 4, 2021 at 9:24 amFor the reason that the admin of this web site is working, no question very soon it will be
well-known, due to its feature contents.
Take a look at my webpage: дать объявление о продаже квартиры
February 26, 2022 at 10:53 amThis is stunning! I’m looking for a farmhouse style for a Twin size. Would you be able to make a 3-D plan for that?
Thanks!
March 23, 2022 at 7:38 pmXBD Collective is an award-winning design firm focused on materializing sophisticated design into inspired physical spaces . Motivated by the pureness of human experience, our team imagines architectural and interior designs meant to envelop interior design and architecture agency in Dubai , inspire, and engage sensory experiences. With presence in London & Dubai, XBD Collective is a recognised architecture and interior design agency positioned to provide a careful bespoke approach to ambitious projects worldwide Architecture Firms in Dubai
April 8, 2022 at 5:28 amMy husband built the swing and I’m so surprised how it turned out! It’s beautiful. The only thing is we are having trouble finding a cover for the mattress and cushions / pillows. Can you guide us?
April 11, 2022 at 3:09 amHi, Thanks so much for the easy plans. Specifically, what size eye screws did you use? I am using 3/4″ rope to hang the swing. Thanks so much for your time.
April 15, 2022 at 10:23 pmI followed your plan almost exactly, except we didn’t have room for a full sized twin, so I modified it for a “narrow twin” – just 30 inches wide, but full length. This might also make it a little more comfy just to sit on as a porch swing. But, two people can’t nap on it at the same time. Also, we stained ours white. Built it in one weekend – probably about 12 hours of work. I couldn’t find the 1×3 boards so I ripped them myself. That also saved a little money. Thanks for the great instructions. It is a nice swing.
August 15, 2022 at 12:26 pm